Pink Noise - The secret technique for volume mixing
Posted by Esteban Miranda on
What if I tell you it´s possible to have a song mixed and well balanced in five minutes or even less?
Setting your track levels properly in your mix can be tough, especially if you haven’t been mixing and mastering for a long time.
Today with Top Music Arts we´re giving you a guide to get your mix up and running in less than 5 minutes!
Always with some tips and guides for you to practice on your own. Let´s start by talking about some fundamentals.

You can use any technique at the time of mixing…
- The most usual approach is to choose one sound to be your main level reference, and balance all the other tracks to it.
- Also a lot of people start a mix by setting a level for the kick drum, snare, and bass (for example), reasoning both that these will form the “structure” of a track (and so are worth focusing on early) and that, as they’re dynamic and energy-rich sounds, they’ll register higher on the meters than most sources; so setting them to an appropriate level reduces the risk of having no headroom at the master bus as the mix progresses and you add to the mix the rest of the tracks.
- Others might choose to focus on the lead vocal if that’s going to be the “star of the show”, and build the mix around that.
And that’s all perfectly valid...
But there is another way, which is quick, pretty easy and, surprisingly, bulletproof accurate:
Instead of referencing a source from within your mix, you can use a pink-noise sample or generator to provide your level (volume) reference and balance each and every track to that, one by one.
It might sound like crazy magic stuff but it works, and it´ll surprise you how effective this can prove to be!
Imagine you have 10 tracks to mix, and each song has as many as 16 tracks for example, and on top of that, it’s all due in two days (worst case scenario kind of thing).
No need to say you´d be in trouble, also you´d be in need for something to really speed up the process!
There is an easier and faster way to find a more balanced and tighter (or less dynamic) mix, and it’s through the use of something called pink noise.

What is Pink Noise?
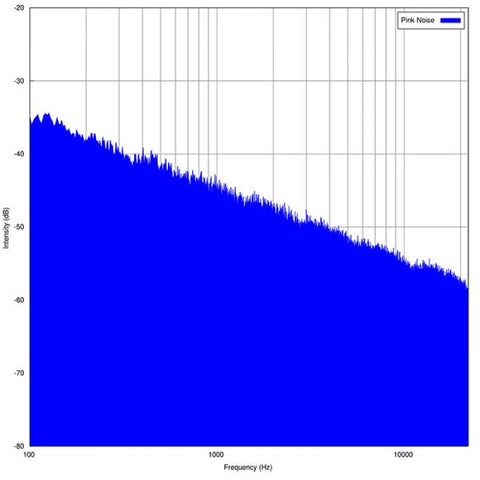
Pink noise is a type of noise that reduces in amplitude as it’s frequency increases.
For every octave, you move up in the frequency spectrum, the energy of the noise decreases by half (3dB). The human ear perceives this type of noise as balanced throughout all the frequency spectrum, hearable by our ear (20Hz to 20kHz).
This means that at 60Hz is going to sound just as loud as 6000Hz, even though it’s not.
With the goal of achieving a balanced mix, you can take this knowledge (that pink noise sounds balanced throughout the frequency spectrum) and apply it to your songs!
If we take a look at pink noise´s freq spectrum and compare it to a properly mixed song, you’re going to notice that their frequency curves look similar to one another.
Here we have the pink noise sample we used for the video (you can download it for free on our links down this article, in the guide) we ran it through the Spectrum plugin of Ableton which made this curve of the average frequencies of the sample. And then we did the same with 3 of the songs we liked most!


You can see that the 3 mixed songs are quite similar between them and that the pink noise curve is quite linear in its own way.
Why use Pink Noise?
You should use pink noise as your reference, ok, but what makes pink noise so special?
Why not white noise, for example? After all, white noise is the one with a flat response, right?
Well, yes, it’s true that white noise has constant energy right across the frequency spectrum. But while this might make it useful for measuring audio equipment, it doesn´t mean it´s useful for mixing sounds.
Why? The human hearing system’s frequency response is not linear but logarithmic. In other words, we judge pitch increases by octaves, not by equal increments of frequency; each successive octave spans twice as many Hertz as the previous one down the scale.
And this means that when we listen to white noise, it appears to us to increase in level by 3dB per octave.
A more ‘human-friendly’ distribution of energy results when we filter white noise so that it loses 3dB per octave (going upwards). Each octave then contains the same amount of energy as the next one, so it sounds natural ‘balanced’.
Again, this is precisely what pink noise is.
White and pink aren’t the only types of noise, but you don´t need to worry about the other “colors” in this context.
 If you’re feeling in need to fill your head with more information on noise types, the Wikipedia page about ‘Colors of noise’ is as good a place to start as any.
Setting your levels properly can bring your mix from 0% finished, to 60% finished in a matter of minutes!
Think about this one for a moment. No other mixing technique is going to affect your whole mix as much as setting your overall levels will.
Using Pink Noise as a Tool for Mixing
Now that you know what Pink noise is, and why it is so handy, you can begin using it as a tool in your mix.
The goal is to make the curve of your song, start looking like the curve of the pink noise.
What you're actually doing here is balancing the levels of your song, using the pink noise as a reference, before you start with the actual less technical and more musical parts of mixing. As simple as that!
To accomplish this, follow these 8 easy steps:
- Turn the output of your audio interface way down. This entire process should be done at a low volume.
PRO-TIP: You can set your master volume at -12dB (as a default measure), and also you can set it a bit higher if you want your mix to reach a higher top level volume.
- Download for Free our 5 minutes, 48khz 24bit HD quality Pink Noise Sample here.
Or you can use a pink noise generator vst, here is a free one called PINK (from Credland Audio).
- Drag the pink noise generator or sample into a new audio track.
- Loop the main section of your song with the pink noise playing in the background:
- Put all the faders down and put on Solo 2 channels at the time (the pink noise channel and the one you are going to level).
- With the pink noise fader settled where you need it to be, gradually pull up the fader of the first track in your song (for example your kick track).
- Bring the level of your kick track (for example), up until it’s barely audible against the pink noise.
- Repeat this process for the rest of your tracks. By bringing each track up to this barely-audible threshold.
Also, you can try to pull them a little bit down from the barely-audible point, so you get more headroom for compressing and limiting (or any dynamic processing you like).
If you level your mix too high, your mix is going to start clipping, and that's not what we´re looking for here!
You're just creating a frequency slope that will match that of the pink noise.
Now that all your tracks are mixed to the pink noise, you should have a fairly well-balanced song. However, don’t bounce it and walk away, you’ll still need to fine-tune a couple things and work a bit of your professional magic. You could give yourself a break and come back to it later, or if you have a ton of songs to do, you could move on to the next one, and then follow the process of completing the mixing work for each song.
And now you can get on with the fun part of mixing! and if you manage your channel gain structure correctly while processing your individual sources (EQs with a constant-loudness function such as Tokyo Dawn Slick EQ and lkjb’s Luftikus can be a real help here) then you should find that you need to do even less tweaking and adjusting of your channel faders than normal.

Finally, if you find yourself benefitting from this approach, but that the overall tonal balance that results from mixing to pink noise is not quite to your taste, it’s worth bearing in mind a couple of things:
You can even use a ‘match EQ’ such as Voxengo’s Curve EQ (bundled with Cubase 7 and onwards, but available commercially in their website, to other DAW users) to capture an average frequency response from a track that you like and use this to shape your pink noise reference. But that’s something to explore in more detail, maybe in another article...
You might run into a bit of an issue when it comes to balancing vocals against pink noise. That´s why we recommend this technique to be your "speeding up the process" type of tool, not your crotch to mix.

Depending on your singer, they might have a pretty dynamic performance, which will be hard to nail down. What you don’t want to do is against the singer’s ‘attack’, rather you should be listening for their softer words. Measure the lower parts of their performance against the pink noise level.
If you want to know more about mixing vocals you can check out our article with a video about How to mix Vocals in Ableton
There’s no “right” way to do anything, but there are certain methods that will give you certain results. This method just happens to nicely set a majority of your levels for you very quickly.
Add pink noise to your tool belt and stop getting hung up on the level adjustment process of your mix!
As always, If you have any doubts, feel free to leave a comment down here
Share this post
- Tags: ableton for beginners, ableton guides, ableton live 10, Ableton Templates, ableton tips, ableton tutorial, tutorial