Ambience & Reverb: Part 1
Posted by James Cullen on
Ambience & Reverb is a crucial part of making music. When you’re creating music to a certain level of quality, you need to be aware of everything going on from the top down. Crafting melodies and beats is one thing, but you also need to be aware of the sonic space that these elements occupy. That is the basis of reverb and ambience, and what we will be covering in this guide. Learning how to incorporate this most vital element of sound into your musical creation process is one of the key aspects that will enhance your skills and make sure you’re on the right path with your production.
Fundamentally, Reverb is a sonic phenomenon which puts sounds into a physical space. This is especially important to consider when you are producing electronic music in a DAW, you’re producing music that exists in a synthetic artificial space, and sometimes you will need to consider how to place your music in a 3 dimensional sonic landscape. Essentially, with Reverb we are artificially emulating something natural.
In order to understand how to use Reverb in a music production setting, you must first understand how it works in nature, and how it works in a physical space. Many modern producer’s experiences with Reverb will be purely software based, however the many digital reverbs we enjoy today are emulations of older technologies or real world spaces.
But let’s not get ahead of ourselves.
First of all, let’s talk about what Reverb actually is.
What is Reverb?
Reverberation (or Reverb for short in case you hadn’t guessed) is a natural sonic phenomenon involving sound waves and the way they interact with their environments. We are used to hearing it in our everyday lives, and it existed long before electronic music production - or music in general - did. It is caused when sound reflects from surfaces, often in different and complex ways. The more unique surfaces there are, the longer the reverb can last and this is why huge buildings like Cathedrals often have long and beautiful sounding reverbs. It’s worth noting though, that it’s not just huge spaces that create reverb, every natural environment contains some. After all, it’s when sound reflects off of surfaces, so this can even be sound reflected off the ground around you. Even open fields or deserts have some natural reverb.

However, it’s not enough to know what Reverb is. In order to truly utilise Reverb and create proper ambience in your music you need to have a fundamental understanding of how it works; what’s happening behind the curtain. This knowledge is essential. As I mentioned earlier, understanding how reverb works in natural environments will enhance your ability to use it in your music.
We all know what reverb sounds like, but what is happening in terms of the sound waves and reflections and further, what’s happening in our brains as we process the sound characteristics with or without reverb?
Why do we need it?
An important point to consider is why we need reverb in music production. After all, if it’s a natural phenomenon, why do we need to artificially inject it into our music? Well, when you’re recording in a studio environment, typically the source sound will be placed in a very controlled, dry sounding environment. Consider a vocal booth; there’s all sorts of acoustic treatment and sound dampening to ensure the recorded audio is as free of anything other than its true sound. This is to ensure that we have as much room to add processing to the sound in the mix. Producers often say; a perfect recording won’t need any EQ or Compression, try and get as good a performance or recording as you possibly can, and you’ll not need to do much to it. Having said that though, we do need to think about the spatial aspect of our music. If you record something with natural room reverb, you’re stuck with it, but if you record it dry, you can add whatever type of reverb you like in post.

So, when creating music and recording, we go through all of this effort to remove any natural reverb, but it ends up creating artificially dead sounding recordings that don’t sound natural or real. We are used to hearing sounds with reverb. So this is why we need to add artificial reverb back into the mix to give the music a sense of real space and dimension. Of course, there are times when music without Reverb sounds fine, but that’s all part of the learning curve; knowing when and when not to use it.
Reverb also serves as a great way to add ambience to your music; gelling the various parts of your tunes together or putting them in the same sonic ‘space’. Consider a recording of a band; the drums and bass could be recorded in the same studio, but guitars and vocals could be added later, even recorded in a different place. Adding reverb in is one way we can make these elements all sound at home in the same environment.
The reasons that the human ear tends to prefer music with reverb can be argued both for and against, it can even be argued that it’s because in the Western world we have a culture of music performed in indoor spaces, historically churches and then moving forward concert halls and venues, so music naturally sounds better to a western ear with reverb. Perhaps some world cultures with an outdoor music tradition where there isn’t the ingrained reverb may think reverb sounds odd?
Either way, Reverb has been inducted into the music producer’s hall of fame as one of the most important effects you can use in your production. Early recording engineers used echo chambers, where a dry signal would be played through a speaker which was placed in a specifically designed room with lots of hard surfaces and with a microphone in the other end recording the signal with the room’s reverb. However, as I’m sure you can imagine, not everyone can afford to create a specific room in order to inject reverb into their music.
This led onto plate and spring reverbs, physical units that you would pump sound signals into and record it coming out of the other end. Nowadays there are a plethora of analog, digital and physical reverb units available to recording engineers and music producers, all producing various types of reverb, from lush soundscapes to old school emulations.
Reverb is Natural
As I mentioned previously, Reverb is a naturally occurring phenomenon, and it’s really interesting to consider the way the human mind processes it. Our brains instinctively make an assessment of a sound’s reverb without us even realising we’re doing it. Consider how when a clap sound has a long reverb, you automatically imagine it played in a huge space. This instinct is rooted in our evolution; it was useful for early humans to be able to know the size of a space they’re in, especially in the dark or at night time outdoors. This is important to consider; you can choose the “size” of the space you want your music to take place in.
We are so used to reverb, that we can make accurate assumptions about the size of a space based on a very brief sonic signal. If you were to be placed in 3 different sized rooms, blindfolded, and told to clap your hands, you’d be able to guess how big each room was relative to the other based purely on the way the sound of your hands clapping interacted with the space.
So why is this possible? What’s actually happening?
When you hear a sound with reverb, you hear two things; the first direct sound coming to your ears directly from the sound source, and then the reflections of that sound off surfaces in the room or space. A short reverb has fewer reflections, and longer reverbs have more. However, some reflections in natural environments can be so soon after the direct sound that your brain can’t distinguish them as two separate sounds. But it does affect how you hear it.
Typically, if a reflection arrives back in your ears less than 10ms after the initial sound for example, your brain will perceive a timbre that is a combination of the direct sound and its early reflection at the same time. So while you may not be able to hear the reflections distinctly, clapping your hands while standing on a concrete floor will sound different to doing so on a grassy field.
The above example discusses when there may be reflections coming from one direction; below you from the floor. But what happens in an enclosed space, when there are lots and lots of surfaces for the sound to reflect off?

Well, that’s where things become a whole lot more complicated. If you were to clap your hands in a cathedral or a concert hall, the direct sound is reflected back at you not only from the floor, but from the walls and ceilings at varying times and intensities. These early reflections can then go on to reflect further off more surfaces, and these re-reflections create the sonic process we call reverb.
So, let’s summarise. In a large space, we hear a combination of a few different things.
- The direct sound, this travels directly from the sound source to the listener’s ears.
- The early reflections, this is when the direct sound bounces back off the nearest walls and ceilings.
- Almost directly after this, the reflected early reflections merge together to become the reverb (as we know it). These reflections steadily die away over a period of seconds which is dependent on the space.
But these aren’t the only characteristics we need to concern ourselves with. The sound of the reflections can tell the human brain a lot more about the space we are in. Do they sound bright? This could indicate hard surfaces such as stone or concrete, or do they sound less bright, this could indicate some soft furnishings to dampen the sound. Finally, there is the time the Early Reflections take to reach us - indicating how near or far the reflective surfaces are- and also how long the reverb takes to die away, indicating how large or empty the room may be.
Synthetic Reverb

Now, when we are introducing this natural effect into our music, we have at our disposal control over so many characteristics of the sound due to Synthetic Reverb. Many reverb plug ins use a process called Algorithmic Reverb, which uses synthesis and algorithms to emulate the real world process. It allows you to have complete control over the sound, allowing you to shape the sonic characteristics of the space your sound is inhabiting. Synthetic Reverbs offer simulations of halls or rooms, as well as emulations of the older mechanical reverbs such as springs or plates. With software, we also have a huge array of unnatural sounding spaces and sounds; the beauty of using the fine tuned controls of a software reverb is that you can create an ambience that sounds as unnatural or natural as you’d like!
So let’s have a look at the specific characteristics of Reverb’s sound, and what controlling them allows you to do.
Pre-Delay and Early Reflections

So, there are a couple of elements which determine how a sound with reverb begins, Pre-Delay and the sound’s Early Reflections. We have to consider again what is happening at the sound wave level in order to understand the process, and in turn we can understand how we can edit these characteristics to achieve the sound we want.
The first we need to discuss is Pre-Delay. Other than the earliest reflections from the floor below the listener, no reverb is heard until the source sound has reached the nearest surface, bounced off it, and returned back to the listener’s ear. This gap between the source and the first reflection is what gives us the first sonic hint as to the size of the space we’re in.
The longer delay between the sound and the first reflection we can hear, the larger the space. In software reverbs, this is simulated by placing an artificial delay between the sound and the reverb generator. This is the Pre-Delay.
Pre-Delay sets the time between the source sound and the first audible sound reflection. Measured in milliseconds, you can experiment with all sorts of values, but that of 120ms is most common, generally speaking.
The Early Reflections then are the first things we hear following the initial pre-delayed signal. We have a lot of control over the fictional space we’re putting our sounds in with this control; it gives a lot of clues away as to the shape of the room, and standard reverbs will have presets for a lot of typical natural spaces like rooms, halls etc. The control we will use most often to shape these is the Size control, and this changes the time between these individual reflections, meaning that the longer the gap, the larger the room, and the shorter the gap, the smaller the room. Some units even offer more refined controls over this quality such as diffusion or blurring, or EQ to emulate the way the sound may naturally bounce and reflect on different surfaces.
A great tip for an intimate effect is to only use early reflections and little to no actual reverb tail. This can be great on pop vocals to give them that up close and personal sound.
Experimenting with these Early Reflections can give your sound a really specific sense of space within the 3D sonic environment. So if these are mixed high it can sound great on vocals (or other instruments which are one single performer). However, the ERs may have to be mixed slightly down on ensembles, as each individual performer would produce their own distinct Early Reflections, so applying the same to all may produce unnatural sounding results.
Decay

A third control that is essential in shaping the Reverb’s sound is the Decay time. After the initial sound and Early Reflections, the Decay Time controls the reverb’s long tail, and adjusting this parameter controls how long the dense reverb tail takes to decay by 60dB.
This is less important in controlling the illusion of size in the space, but its tonality can still reinforce the illusion of the space’s characteristics, and whether the space contains harder or softer surfaces.
The decay of a typical reverb is steady as it decays to silence; the rate will be fairly consistent. However in some more unusual spaces, the reverb may decay for a while, level out, and then decay further, especially if a space has unusual characteristics or shapes within it. These all give the brain clues to the characteristics of the space.
The Decay is a crucial aspect of the reverb’s sound and a lot of algorithmic reverb will allow control over this which emulates a standard exponential decay. More complicated units allow precise emulations of more complex spaces such as a cathedral or huge hall.
Diffusion, Density and Modulation
Two of the other most important parameters in a Reverb are Diffusion and density.
Diffusion controls the rate that the density of the reverb’s tail builds after the initial sound, while Density controls the number of reflections that occur in the reverb tail. You can alter this to create a very lush and thick reverb, or a thinner sound.
In general, lower Diffusion and Density values usually create more grainy sounding reverbs, which can sound good on vocals!
You can also find Modulation in many reverb plug ins, which adds a nice chorus style effect to the mix. Shifting the pitch and time, this effect can make the reverb tail sound more complex and helps avoid resonances. It’s worth noting that this type of effect would not occur naturally, but it sounds good in a musical context! One of the benefits of software emulations is we can insert characteristics like this that aren’t present in the natural sound.
Convolution Reverb
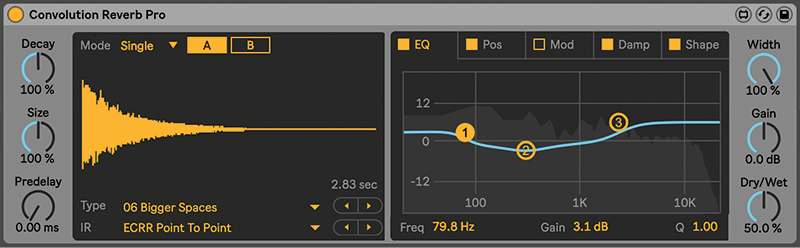
Any digital reverb in a DAW is likely to be an algorithmic reverb. As mentioned above, these use a complex system of synthetic filters and delays to essentially fake real-life reverb. However, a great option if you want super realistic sounds is by using a process called Convolution.
This is a process whereby you can record the actual reverb characteristics of any given space, and then apply it to your own mixes and tracks. It sounds like a pretty convoluted process (pun intended) but don’t worry, there are lots of convolution reverb plug ins that will do the job for you. It allows you to put your sounds in a virtual reverb recreation of Notre Dame, or the Grand Canyon, or even classic live rooms from famous studios.
But how does this process work?
In order to create a recreation of the reverb characteristics of a given space, first you have to take a very short and clean sample. A super short click would work best. This is then played through a very accurate speaker system. The resulting reverberations from this click can be recorded as an Impulse Response. This Impulse Response (IR) can then be used in a Convolution Reverb plug in, and applied to anything within your DAW.
The thing about Convolution reverb, however, is that it can be a beast on your computer’s processing power. This is because the Impulse Response is applied in a way that requires multiplying every single sample of the audio by IR. This is an easy enough process in principle, but as I mentioned, it can be very processor heavy. Not so much of a problem for a lot of modern computers though!
Certain Convolution Reverb plug ins do come with the functionality to play a sound in a space and then create your own Impulse Responses, however it’s usually not necessary to do this, as they come with such a huge selection of presets anyway!
One final point to mention on Convolution Reverb though, is that it can be quite limited due to the inability to accurately emulate real reverbs’ non-linear characteristics, such as chorus, distortion or compression for example. This is a small point though, and you’ll find many uses for a Convolution Reverb if that’s the sound you’re looking for.
_______
So, hopefully you got something out of this deep dive into Reverb and Ambience. Make sure you check out the next part of this series, where we will go into some specifics of how you can use reverb in your mixes to get the ambience right. As always, thanks for checking out Top Music Arts, and browse the rest of our site for more resources on music production!