Creative Mixing Tips
Posted by James Cullen on
The perfect radio ready mix is a dark horse. It’s an elusive, mysterious goal that many producers and engineers reach for but rarely achieve. Getting that perfect mix is dependent on a lot of factors, some of which being the genre, the instruments used, or even the intended format of the release. It’s a fundamental part of a producer’s skill set, and it takes years of practice and repetition to develop the skill.
Some people find mixing easier than others; to some it comes naturally, as it’s simply a process of using their ears. To others, it’s more of a challenge, requiring more study of frequency charts, referencing and comparison. There’s no right or wrong way to approach it, but developing this skill is something that gets better over time. The more you mix, the better you’ll become.
Whether you’re a natural or not, a seasoned mixer or relatively new to the game, today with Top Music Arts you should find something useful, as we explore some creative tricks to help take your mixes to the next level. So read on, and make sure to implement these techniques into your next mix!
1) Slapback Delay on Vocals
Mixing vocals can be tricky business. How many times have you managed to get every other part of your mix sounding perfect, but then struggled to make the vocals sit right? Whether they’re lacking punch, or sounding too distant or far away, there are a million ways vocals can cause you issues when mixing.

Today we are going to explore a cool trick to make your vocals sound like they’re jumping out of the speakers; a way to give them power and punch without losing any of their clarity.
Normally, people would want to use Reverb on a vocal track to create a sense of space. There’s nothing worse than a flat, dead sounding recording after all. While Reverb is often a great choice for vocals, it can often leave them sounding distant or washed out. A longer reverb tail can also make the words start blending together, losing the clarity of the vocal. This obviously isn’t what you want if your vocals need to be centre stage. So here’s a cool trick.
Stereo Slapback Delay.
The issues listed above with using reverb are exactly what we’re avoiding when using a Slapback Delay effect on a vocal track. It creates space without washing out the vocal, we don’t lose any of the cohesion of the words or phrases, and the power and punch is still there.
A Slapback Delay is simply a delay with little to no feedback. Almost every delay plug in has a feedback control, and this dictates how much of the repetition we hear. A high feedback is one where the sound repeats over and over. Think shouting ‘Hello!’ into a cave, for example. A low (or no) feedback setting means you will get a delay, but absolutely none of the repetition.
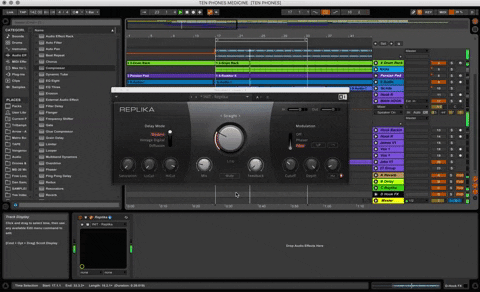
The Slapback name comes from the fact that we’re emulating a sound wave literally ‘slapping back’ from a surface. If you’ve ever been to a big concert venue and heard a snare or other drum bouncing back at you from the back wall, that’s a slapback delay. We can create this effect in any delay plug in using little to no feedback, and a short delay time. You can adjust the feedback ever so slightly if you like; you may find that it sounds a little more natural with some (no more than 10%) feedback, but in general we want to avoid the repetitions and have one single one, just like the example above. It emulates the way the sound behaves in this real space, without adding the washed out qualities of a reverb plug in.
Using a Stereo slapback delay works like this; apply a short delay time to the left channel (maybe 100ms) and a slightly longer or shorter one to the right. Make sure the channels aren’t linked - this is a control that some delay plug ins have where the left and right channel’s delay times are linked together. If they are, this effect won’t work.
The reason we are using stereo is that as well as creating the space with the slapback sound, we are also creating a 3D stereo image, with the slightly different delay times in each channel. This makes the vocal sound larger than life, gives it its own sense of space, all while ensuring it sits on top of the mix clearly, instead of sounding distant and washed out.
It’s a great trick to add a little something extra to your vocals, so try it out!
2) Mixing with Pink Noise
If you’ve had your ear to the ground, you may have noticed people in the music production spheres talking about mixing with Pink Noise. This is a technique that’s gained some popularity recently, and it’s definitely worth talking about. But before we dive into exactly what Mixing with Pink Noise entails, we first need to examine exactly what Pink Noise is. I’m guessing you’ve heard of White Noise, but Pink?
The use of colours to define types of noise can be confusing, there’s White, Pink, Brown and Blue, but they each refer to different characteristics of the sound. White noise is a sound with equal power across all the different frequencies, it’s basically every frequency we can hear playing at the same volume at the same time. The colours describe different but similar sounds, take a look at this quote from Berkeleywellness.com on the characteristics of the different types of noise.
“Pink noise is like white noise, but instead of having equal power across frequencies, pink noise comes out louder and more powerful at the lower frequencies (think of it as white noise with the bass turned up). Pink noise is often found in nature, such as waves lapping on the beach, leaves rustling in the trees, or a steady rainfall. Brown noise is even more skewed toward the lower frequencies, so the sound is deep, like the sound of thunder or the low roaring of a waterfall. Brown noise may sound less harsh than white or pink noise. With blue noise, higher frequencies are emphasized, such as a high-pitched hissing of water. There’s more research on pink noise than on brown or blue noise, but far less than on white noise.”
An important thing to note is that humans perceive sound in Octaves, so we hear in Pink Noise. The thing about octaves is that they don’t change depending on where they are in the frequency spectrum. There’s the same number of notes between 400 Hz to 800 Hz, as there are between 5 KHz and 10 Khz. So in terms of frequency, one of those is a 400Hz difference whereas the other is a 5000 Hz difference, but the number of notes in the octaves of C to C doesn't change.
Now, you may be wondering how this applies to mixing.
Download a Pink Noise sample track (available all over the internet) and drag it into your DAW. Bring down the volume of every other track, and set the pink noise track as a comfortable average level - the volume you’ll be mixing to. Since we hear in octaves as opposed to frequencies, the Pink Noise serves as a great reference point for the mix.
Next, identify what your core layers are in the track. It might be drums, kick and snare. It might be the bass. You’ll know depending on your mix. Once you’ve done this, Solo the first one while also having the Pink Noise on Solo. What you want to do is slowly bring the volume of the other track to a level where you can barely hear it over the Pink Noise. Think of the Pink Noise as a cake, and your track as the icing on top, it wants to just sit on top of it, but barely.

When you’re doing this, turn any send effects off. We want to mix the true sound of the instruments here, and effects can muddy these. To get the best results, turn all effects off and mix your instruments’ pure sound to the Pink Noise track.
When you’ve done this with the first instrument, repeat the process with your other core tracks. Then move onto the rest of the instruments, repeating this process over and over again. Solo the instrument against the pink noise, and mix it so it’s barely audible against it. You may run into an issue with vocals, but a good thing to remember is; if you have a dynamic vocal performance, match the softest words against the pink noise, not the loudest. You want the whole performance to sit right, not just the loudest words.
When you’ve done this, listen to everything and mute the Pink Noise. You should have a fairly well balanced mix. However, you’re not done. Don’t bounce it out just yet. Give yourself a break, and come back to it in a day or two. You’ll want to tweak a few things, re-engage those effects and make sure everything sounds good.
Important to note is that you should resist the urge to start messing around with the levels again; some things may sound different, but the key with mixing to Pink Noise is to have faith in the process. Ultimately though, it’s your mix, and you can use Pink Noise mixing as a starting point to balance everything before you make your own tweaks, or you can mix to Pink Noise and use that as your mix. Either way, this is a great way to mix your tracks to get a clean and balanced sound.
3) Parallel Compression
Now, you’ve probably heard of Parallel Compression. That’s because it’s one of the most popular techniques used by industry professionals in their mixing. Compression is a core player when it comes to a mix engineer’s roster, and knowing all the ways in which you can use it is of paramount importance.
The clue here is in the name: Parallel Compression. What you’re doing here is blending two versions of the same signal, a raw, unprocessed version and a heavily (or otherwise) compressed version.
But why would you want to do this?
Think about what compression does. While it’s great for making things punch and stand out, at its core it’s a tool for shaping the dynamics of a sound. One of the downsides of using compression heavily is that you can often lose the dynamic character of a sound because you’re having to compress it heavily so it’s heard amongst everything else.
Parallel Compression offers you a way to solve this problem.
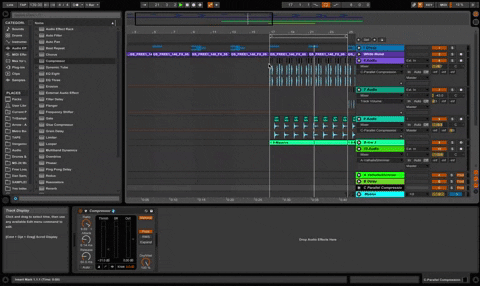
Open Ableton, and stick a drum loop on an audio track.Now, those Return Tracks are for more than just Reverb and Delay you know!
Create a Return Track, and make sure to send the signal from your Drum Loop audio track to this Return. Now throw a Compressor on it. The settings you choose for your Compressor will play a huge role in how the Parallel Compression is going to treat the audio you’re sending to it.
If you want natural sounding dynamics, you’ll want to apply lighter compression to the Return track. Try a Ratio around 3:1 and apply the lowest Threshold you can. When it comes to Attack time, you’re going to want to use Fast for a thicker sound, or Slow for a punchier sound. Experiment if you’re not sure, you’ll hear the characteristics of the sound change as you tweak the attack.
You can add more beefier sound by applying heavy compression to your Return Track’s signal, so as always, play with the settings and see what sounds right.
After you’ve figured out the exact settings on the Compressor, it’s time to make sure the two signals are blended together perfectly. The point of parallel compression is to give your mix the benefits of both the compressed signal and the dynamics of an uncompressed sound in one go. So as a rule of thumb, a good practice is to turn the volume of the compressed Return track all the way down, and then slowly bring it up until you hear it.
If you hear an increase in the volume of the part, that’s when you’ve hit just above the perfect level, so turn it back down. Now, mute the Return Track, and compare the two. Hear how you get the uncompressed sound’s dynamic character as well as the character of your compressor in the same signal?
Experimenting with muting and unmuting the compressed signal in the context of your mix will help you decide if it’s working or not. Parallel Compression is a great tool, but it needs to be used properly to sound good. It isn’t a magical fix all! It sounds incredible on vocals and drums, but used correctly, it can make any instrument sound right in your mix.
You can even apply parallel compression to an entire mix! But let’s not get ahead of ourselves.
4) Using Ableton Live 10’s Collections
You might be thinking ‘what does this have to do with mixing?’ so let me explain.
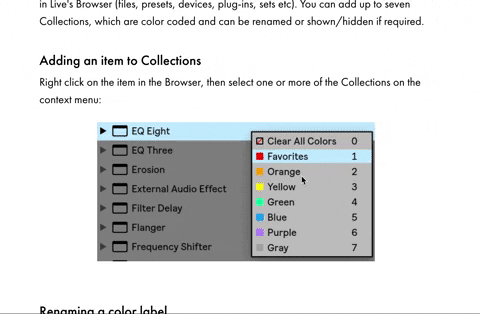
An awesome new feature introduced in Ableton Live 10 is Collections. This allows you to tag or group your favourite plug ins within Live’s browser for easy and quick access, adding an extra level of organisation to your workflow.
The efficient producers amongst you will understand the importance of a sleek workflow, and Ableton’s Collections are a great way to introduce that into your process.
Collections introduces 7 colour labels with which you can group your plug ins. The first one is called ‘Favourites’ and is a Red tab, the other colours are available for you to rename to whatever you like.
If you want to add an item from your Live browser to a collection, simply right click and select one or more of your collections from the menu.
So, consider your mixing process. Perhaps you have a few favourite go to plug ins, but perhaps they’re hidden in layers of contextual menus when it comes to Live’s browser. While it may seem like an insignificant time saver, being able to instantly click into a collection and have your most used essential plug ins right there allows for less time fiddling with menus and more time mixing.
You could even have one collection for mixing, one for mastering, one for creative effects. There are 7 different collections you can use and create, so there’s plenty of room to develop your own shortcuts to improve your workflow!
5) It’s all about Volume.
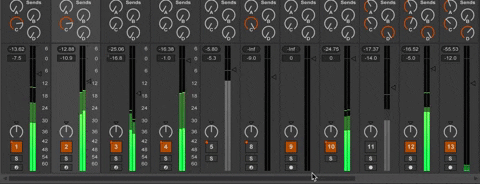
It may sound obvious, but when it comes to completing a mixdown, the single most important element of it is getting the volume right.
There are two ways to tackle this. Firstly, you’d be surprised how many issues in a mix can be solved by adjusting the volume. It’s the essential first port of call; making sure your levels are right will save you a lot of hassle when you’re doing the rest of your mix. Before you apply any EQ, Compression or limiting, it’s the volume that you need to worry about most. This is the core of what mixing is all about.
The second point about volume is, try mixing at a low volume. This is beneficial for a few reasons. Firstly, it lowers your risk of ear fatigue if you’re mixing at a lower volume, as well as reducing the harsh room reflections that come with louder levels. Secondly, if you can make something sound good at a low volume, as a general rule it will sound good at a louder volume too!
Get mixing!
So, hopefully these 5 creative tips for mixing will help you elevate your mixes to that next level. There are tonnes of tips and tricks out there, but I’ve tried to select a core few that will help you the most!
Be sure to try them and see what you think, there are a lot of ways to enhance mixing through trial and error, but this can often lead to frustration, so hopefully these tips will give you a few areas to focus your attention.
Thanks for checking out this article with Top Music Arts, as always, stay tuned for more production tips and tricks, and check out the rest of our site for Ableton Templates and more! Try these tricks, and let us know how your mixes sound!