Wavetable Synthesis? Xfer Serum is the answer.
Posted by Esteban Miranda on
Are you new to Serum? Do you feel like it´s impossible to understand how to use it?
Today with Top Music Arts, we are bringing you some tips and a review of Serum, maybe the most used synth vst in today´s music.
To give you all a hand and help you understand the great wavetable and subtractive synth VST Plugin that Xfer Serum really is. And if you get used to it, you´ll see what a great tool it is to have at your disposal!
When you start using a new synthesizer sometimes it can be a bit confusing and every synth has its own learning curve. In our opinion, this isn’t a hard synthesizer to learn, since it’s really ‘graphic’ and you can not only hear, but also see a lot of the changes you make, giving you a better understanding of the parameters and functionalities in your sound design process.
If you´d like to know more about Sound Synthesis you can check out our previous article about the 4 Main types of sound synthesis explained
Let´s start by talking about the plugin…
![]()
Serum is a Wavetable Synthesizer plugin, available in VST / AU / AAX, created by Xfer Records, that has completely taken over the music production world as the most used synth plugin in today’s music.
It features a great visual and creative workflow-oriented interface that makes creating and altering sounds fun instead of tedious like most of the synth plugins out there.
For starters, Xfer invested a lot of resources in creating oscillators that produce inaudible amounts of Aliasing (the inharmonic artifacts that can occur in digital audio).

The result of that is that the Serum's oscillators sound cleaner and slightly brighter than what we're used to hearing from the rest of synth plugins. It's most noticeable when you are playing your high-pitched parts, immediately setting it apart from everything else on the market!
You can import your own audio to create custom wavetables, but Serum has a full-spec wavetable editor built in to keep happy even the more hardcore users.
Since its release, Serum has quickly become the most popular software synthesizer for music production all over the world.
There is no other synth more widely used, reviewed, and supported by professionals of different styles on the market.
Now there is Ableton live 10´s Wavetable device, that presents as the competition, but it still has a lot to improve.
Serum’s complete, intuitive, high quality, and easy-to-use design makes it stand out as the best wavetable synth available.
Not only that but for those of you who are not looking to do too much of your own sound design, this software synth has a huge variety of high quality presets available. You can start by just using the presets and play with the sounds.
Next, we are going to talk about what the plugin features for us...
Features
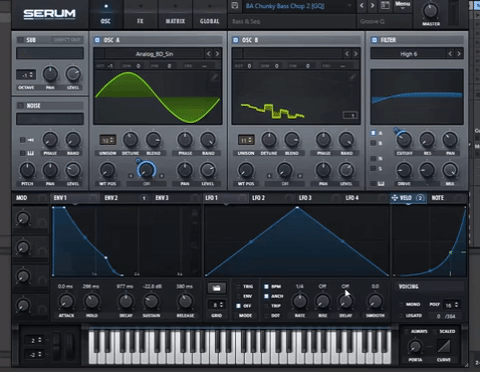
Dual Wavetable Oscillators
The A and B oscillators are built around the most advanced wavetable engine we've ever seen.
You get a 2D waveform view by default, but clicking it reveals a very handy 3D wavetable display that indicates the current wave cycle, or 'frame'. Great for those who are new to wavetable synthesis.
Dual Wavetable Oscillators allow you to create a huge variety of sounds. You can choose any of the 100 factory presets, import your own, or download presets from a third party!
Included with the oscillator section are a sub-oscillator and a noise oscillator (with over 200 unique options) as well.
Waveforms can be blended statically or dynamically using regular crossfading or harmonic/spectral morphing.
With the Dual Wavetable Oscillators, the possibilities are endless!
Filter Module
Serum includes an impressive 75 filter options. This leaves many other synths with only 4 basic options behind.
It features many intuitive controls of the filter such as Cutoff, Resonance, Drive, and Pan. These options allow you to tweak the filters to make it sound as you like.

Effects

Serum features its own built-in 10 unique effects that are helpful to add character and texture to your sound. These effects include:
Delay, Reverb, Hyper/Dimension, Flanger, Phaser, Chorus, Compressor, EQ, Distortion, and Filter.
These effects are routed in the order they are placed on the list of effects!
This makes it extremely simple to rearrange them with a simple drag and drop.
There is also a Serum VST FX version available that will help you use this valuable aspect of this synth, on sounds generated outside of the plugin.
Modulation
Serum provides an insanely detailed modulation panel. This panel features:
4 Macro Controls, 3 Envelopes, and 4 LFO Modules.
The plugin´s interface is designed to make it extremely easy to see what is going on with each of your parameters, as they are all listed out for you to adjust to your liking.
With all these features, it really allows you to squeeze some extremely unique sounds out of this synth.
In order to help all of you do that, we have some tips for you, so you can get used to it and work your sound design like a pro!
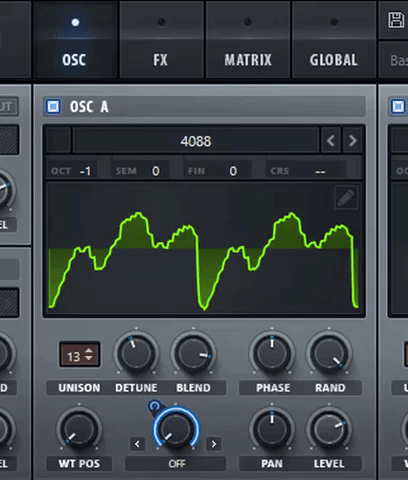
Unison, Detune, and Blend
These are all rather basic parameters that you are probably already familiar with, anyway we still think these are worth mentioning in this features list as they can really shape your sound from being a single and narrow wave to a wide and open one.
Unison is the number of voices your oscillator has and Detune determines how close or apart these voices are.
Don’t open Detune too much as your sound will get out of tune with the rest of your instruments, and maybe that isn`t what you are looking for.
With Blend, you can adjust the levels of said voices.
Now for better judgment, we have a simple pro and cons list to take all the good and the bad in consideration:
Pros
- Morphable Oscillators: you can manipulate the waveforms in your oscillators with ease.
- Easy to use visual workflow makes you want to jump right into tweaking sounds.
- 10 Unique sounding effects built-in.
- Limitless modulation options.
- The included Serum VST FX version is a great versatile tool for audio manipulation.
- “Drag and drop” routing and parameter assignment makes sound design incredibly easy.
- One of the easiest synths to learn for beginner sound designers.
- Features several interesting functions, such as converting text into sound, and photos into waveforms.
- A huge online community dedicated to Serum tutorials, presets, and more!
- Huge variety of complex filters compared to synths with only basic filter options.
- Affordable pricing as little as $10 a month on some websites (rent-to-own).
Cons
- No built-in arpeggiator.
- Heavy CPU usage, causing a lot of strain on your computer.
- Depending on your taste, many of the sounds are extremely “Digital” sounding (If you’re into analog-type tones, maybe this can be a huge issue).
- Serum VST FX Version can be a little bit hard to set up in certain situations.
- More oscillators would really take this synth to the next level.
Let`s move on with some shortcuts and tips…
Shortcuts
One of the best features of Serum, that isn't immediately obvious, are the shortcuts. Use of Ctrl, Shift, and Alt opens up much wider control of the synth, from LFO drawing to modulation direction.
By using Alt + Drag, you can adjust the modulation range by clicking on the knob, which saves trying to click the smaller modulation range control above the knob.
Alt + Shift and clicking on a modulated knob changes from unipolar to bipolar mode.
Command (for Mac) / Ctrl (for PC) + Click on any parameter resets it to its original value, great if you want to undo a change. For more precise movement hold shift while moving a knob and it will move much slower allowing smaller changes.
There are many more of course, discoverable through playing around, we recommend you to take note and start getting used to them!
TIPS
Copy an oscillator
You can copy a complete oscillator from A to B or from B to A with the Menu button on the right side of your selected preset.
This saves you the hassle of saving the wavetable and copying the parameters manually.
Mouse hover for Help
If you’re ever confused while using Serum or forgot what a particular knob does, hover your mouse over a parameter and wait, for a little description window to pop up by your mouse pointer.
That way you can figure out certain parameters without referring to the manual or google every time!
Change All LFO Curves and Points at Once
Hold Alt key while changing LFO curves to change them all at once.
You can also do the same with your LFO points by Click and dragging them to select more than one of them (LFO points) and change all at once.
Make a synth mono
You can make a true monophonic sound by clicking the Global tab, and on the left under the Unison section, you need to bring them with all the way down to 0.
If you have both oscillators running, do it on both.

Sync Envelopes to Tempo

Ensure you have Double-Click for typable values on controls enabled on the Global tab.

With this enabled, you can double-click a parameter in Serum to enter the value you want with your keyboard.
On the envelopes, you can also enter subdivisions like a 1/4 or a 1/8 note for example. 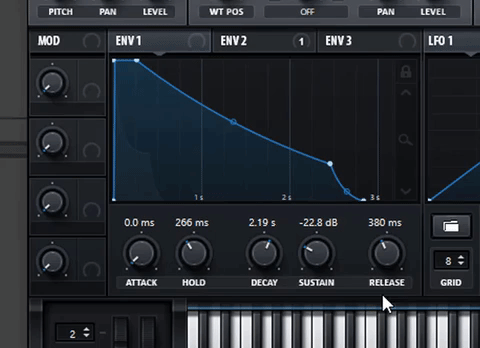
When you enter this, Serum will work out how many milliseconds there are in a 1/4 note at your projects current tempo and sync with it.
Serum FX Envelope Trigger
You can send MIDI to Serum FX on a separate channel to trigger the envelopes.

This is a great way to process your sounds even further, or also use the FX from Serum on any audio tracks or other synths!
Change Mix to Level
Click below the Mix knob (the text) on the filter section to transform it into Level which basically makes it a gain knob.
This can be really useful if you overdrive the filter using the Drive knob and need to make up the volume.
Turning LFOs into Steppers
You can hold Shift to turn your LFO drawing tool into a stepper figure.

This trick is great for creating your own ARPS and Sequences!

Customize your Serum default instance in Ableton
Click on the triangle next to the wrench to pull up the VST/AU configuration panel.

Once you click Configure, any parameter you click on inside Serum will map to the macro controls on Ableton.
This is especially helpful if you have a MIDI Controller and want to quickly manipulate Serum’s parameters. We recommend you all to play with the parameters in each instrument to get familiar with each one and what they do!
Lastly, right click on the device title bar and select Save as Default.
For a more practical use, you can save your Default Serum instance inside an Instrument Rack named how you want.
That way, when you want to add a new instance of Serum all you have to do is hit CMD(Mac) Ctrl (Pc) + F, then type the name you´ve put it.
Minimum System Requirements
While they do not officially support older systems such as PowerPC or deprecated versions of Mac OS, the plugin may work in certain cases.
If you are in doubt, or to be sure that serum works fine with your setup, we recommend you all to take advantage of their free, fully functional 14-day demo version.
These are the minimum requirements set by Xfer people:
Mac
2 GB RAM
Mac OS X 10.9 through 10.13
Pro Tools 10.3.10 or higher or a VST/VST3/AU-compatible host
Display resolution of 1440 × 900px or 1280 × 960px or higher
Windows
Rent to Own
Serum is no doubt, an expensive plugin, we know that, but If you are a student, or a struggling musician or producer, maybe you are in luck because Serum has been made available as a Rent-to-own synth in collaboration with Splice.
This means that you pay $9.99 monthly and get complete access to Serum, with options to pause the subscription and resume later when more money comes your way.
The best part is that Serum is then free to use after it has been fully paid off.
This means that you have access at the equivalent cost of maybe a few Starbucks coffees per month.
This is a platform that we all hope many companies adopt because it opens up the sound options to people who can't dish out the bulk sum immediately.
And in this particular case, this is a very powerful tool to have available in your production setup!

Skins
For those who like to custom things up, there here we have some Serum skins that you can download and install yourself for free.
First, a little guide in case you are not sure about how to make it happen:
- Download the skin you like (most of the links below will be direct downloads, so there shouldn´t any trouble).
- Extract (unzip) the rar or zip file.
- Find the folder that is named just the skin.
The main skin will contain files like a 1x folder, 2x folder, colormap.png, and fonts folder. NOT every skin will have a 2x or a colormap file, but most do.
- Open Serum.
- Click on Menu and then Show Serum Presets Folder.
- The folder that now appears will have all of the Serum presets, wavetables and noise files, as well as a folder called Skins.
- Drag your new skin you downloaded into the skins folder.
(In case you had trouble finding it)
On Windows the folder is:
Documents/Xfer Serum/Presets/Skins
On Mac, the folder is:
Library/Audio/Presets/Xfer Records/Serum Presets/Skins
If you travel to that path you will see the "Default" folder for the default skin. In case something goes wrong, don't touch that. Just leave it there so you can restore it (in case something goes wrong).
The skins you download will come in a folder, just place those next to the Default folder (at the same directory).
- Go back into Serum, click Menu and then "Rescan folders on disc".
- Click on the big SERUM Logo top left of the synth, a drop-down menu will appear and now you can navigate to your fresh new skins.
Here are the skins! You can click on the images to download them.
We hope you like all of them, let us know in the comments which one you like the most, or if you have any doubts. Also If we missed any tips or want more you can let us know!
Ableton Live by Nasko

Rick and Morty by Wolf.wav


Anthracite by aevitunes

Minimal by recordkiller

PRO HDR by Ninevibes.tv
