Vocal Production Tips
Posted by James Cullen on
With the launch of Ableton Live 11, and its inclusion of Comping, I’ve been thinking a lot about vocal production techniques recently. It’s been a long time coming, but now that comping is actually available in Live, the possibilities for recording audio and especially vocals have opened up a lot more.
I used to think of Logic as the program I used if I wanted to do some recording, and Ableton as the program I used if I wanted to produce some electronic music, often recording my vocals and instruments in Logic and then moving that audio into Ableton to work on the other parts of the track. But now it seems that Ableton has finally caught up and introduced some cool new features that I’m really excited to play with.

But enough about Live 11, because what I really want to talk about in this article is some tips and tricks for general use on vocals in your tracks. Whether this is using vocal samples, or recording vocals, most genres will find a space for the human voice in the music, so there should be something in this guide that caters to everyone.
As always, if there are parts in this guide that aren’t really relevant to you, feel free to skip over those, I’ll try and make each section as independently useful as I can!
So let’s get started!
Using the Voice
The first thing you should consider is whether your chosen genre of music has a place for the human voice in it. It sounds a strange concept initially, but consider how some genres of music are fairly voice-free, while others use the voice as a staple of the genre. Country music is all about people singing their hearts out (usually about whiskey, love and old porch swings) while playing guitar, whereas hard German industrial techno may not require as much consideration for vocals. (I often find that any extended vocal phrases in club oriented dance music can sound really cheesy unless they’re done right!)
So ask yourself first of all how exactly you’re going to use vocals in your music. If you’re wanting to learn some tips on recording yourself or another vocalist singing, that’s great, but if you want to learn how to process samples of other people’s voices into cool and unrecognisable sounds, that’s a whole different ball game.
We will start with one of my favourite tricks, which thanks to Ableton’s audio editor is super simple and super effective to do.
Garage Style Vocals
I love UK Garage. Plain and simple. Whether it’s the fantastic drum work or the pitched up (or down) vocal samples, there’s something amazing about how it sounds.
Ever since hearing Burial - Archangel (I know, it’s such a cliche) I have always loved that vocal sound he uses on the main samples, and have tried many times over the years to recreate it in a convincing way. I always struggled, until I stumbled on a technique so simple I couldn’t believe it had been hiding from me.
So, if you want to learn how to do this trick, the first thing you’ll need is a vocal sample. Old school RnB / Hip Hop acapellas are an absolute gold mine for these types of vocals, so if you have any of those, pick a phrase and drop it on an audio track in Ableton.
Side Note: a friend once gave me a great trick for choosing vocal samples to work with. Drag in an acapella, and then loop your beat for as long as the acapella lasts. Making sure it’s Warped and in time, just listen through to it. Any phrases that sound good over your beat, highlight them and drag them to another audio track. Once you’ve done this for the whole acapella (or until you’re satisfied you’ve found a nice vocal sample) remove any unwanted vocals and then get to work with your sample!
Now, are you familiar with this little interface?

Ableton users, I’m sure you know what this section is, but for the benefit of everyone I’ll briefly explain.
This is Ableton’s audio editing interface for any audio clips you drop into Live. (Note: I’m using Live 11, and this looks a bit different than the previous iterations, but the functions are all the same)
It allows you to control whether or not the clip is Warped and in time with your project, adjust the gain and pitch of the sample, as well as reversing it and applying a few other effects. It does this by using several different warp modes, you can see above that I have my vocal sample on the ‘Complex Pro’ warp mode in the drop down (just labelled Pro), and this is where the magic happens.
If you try and pitch an audio sample up and down while in the standard Beats Warp Mode, you’ll hear straight away that it sounds horrible. That’s because this warp mode is primarily meant for use on percussive samples rather than ones with a lot of melodic content. Complex Pro, on the other hand, sort of does what it says on the tin; it gives you more complex options for adjusting the audio.
Now, you’ll see also two boxes labelled Formants and Envelope. These are where you will create that garage style vocal. Adjusting the Formants value is what will instantly create that sound; and the Envelope will allow you to further shape your sample to exactly the timbre you want.
So here’s a fun little trick I use. I duplicate my Vocal track so I have two identical channels. Then, once I’ve decided whether I want my vocal sample to be a lower pitched one such as in Burial’s tunes or a high pitched ‘Chipmunk’ style sample, I’ll set one of the tracks to achieve this effect, adjusting the Pitch, and then setting the Formant and Envelope values accordingly.
Then what I do is set the other vocal channel to be the opposite, so if I want the sample to be high pitched, I will do this second channel low pitched (or vice versa). Once this is done, I’ll mix the second channel so it is barely audible, but still gives the vocal sample a bit of extra weight behind it.
I recently did a remix of Lil Mama - Lip Gloss and I used this technique throughout; I doubled the vocal an octave lower, set the Formant filter to get that slow and sleepy sound, and mixed it so it’s barely audible, but you can still hear it if you pay attention.
You can check out the remix here and hear the effect in practice.
This is a really fun technique to use, and the settings required will vary for each time you want to use it. I find beginning a track with a basic beat and then throwing some vocal samples on it with these effects is a really great way to practice this technique until I’ve found a style or timbre that sounds perfect for what I’m after, so give it a go!
Recording a Vocalist

So, let’s take a look at the complete opposite end of the spectrum. You’re taking a break from making UKG bangers and you’ve decided to record a singer. I’m going to assume you know the basics of using a microphone, audio interface etc, so I won’t bore you (or myself) by writing those out.
But what are some best practice techniques to use when recording to ensure you’re getting the best results? Maybe you’ve hired a studio for a limited time, or the vocalist is only available for one hour and you want to make the most of the time you have. What techniques can you employ to make sure you’re doing the best job?
-
Always Record Dry
As a rule of thumb, you should make sure that every time you are recording a vocalist, you are recording it with no effects whatsoever. It’s a good idea to always record your vocals dry unless you have a specific reason to do so otherwise. Sometimes you can send some reverb or delay to the vocalist in their headphones, because this sounds more natural than completely dry vocals, but you want to make sure that the audio you’re recording has no effects applied.
While for other instruments such as guitars, effects may be applied externally through pedals, so this is what you’d record, however with vocals, in almost all cases it is better to apply any effects afterwards. Imagine how complicated it would get trying to comp together different takes if they have effects on, there would be some nasty artefacts that we’re all just better off without!
-
Record Everything Your Singer Does
This is one of my favourite tricks, and it’s a bit sneaky, but you’ll understand why it works in a second. A great tip that was given to me by one of my professors in University was that if you’re ever recording a vocalist, record everything they do.
This is because as soon as you tell a singer “right, this is THE TAKE!” they are likely to feel that pressure, and it could affect their performance on a psychological level. So it’s good practice to record their ‘practice’ or ‘warm up’ takes without telling them, in order to capture their performance when they aren’t feeling that pressure to give their best.
It seems counterintuitive, but sometimes you’ll find that the best performance a vocalist gives is the warm up one, because of a myriad of reasons. Sometimes it’s a simple as feeling relaxed and comfortable!
-
Harmonies
Harmonies make vocal work shine. If you’ve ever been able to get a studio acapella of a huge international song, you’ll hear that what sounds in a full mix like one vocal line, is actually a complex layering of subtle harmonies to enhance and support the main melody.
I have always been a sucker for harmonies. As soon as I heard Fleet Foxes, James Blake and Bon Iver I knew I had stumbled upon something amazing, and when I used to make that type of music I would spend hours recording and generating harmonies.
Generating. Weird word to use, right?
Wrong! If you aren’t able to get a vocalist to record harmonies, that doesn’t mean you have to go without them. Many plug ins and DAWs offer pitching solutions in order to create harmonies from one vocal line, and this is a super viable method to create lush sounding vocals. Duplicate your main track a few times, and then experiment. Pitch one up a 3rd, one down a 5th, and see how it sounds. Even if in isolation it sounds “robotic” or obviously “generated”, that doesn’t mean it will sound that way in the context of a full mix.
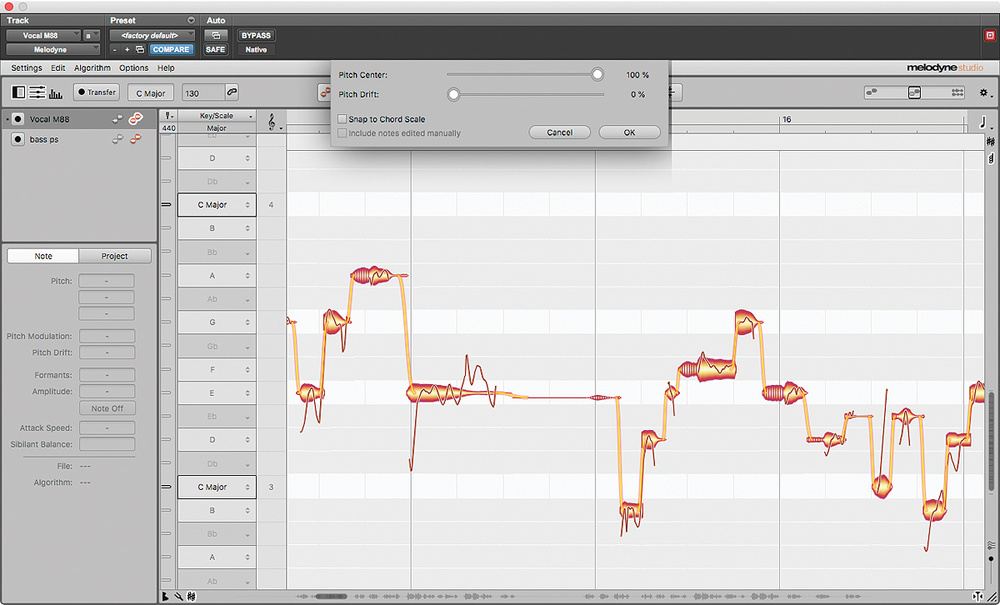
Melodyne is a great way to do this if you have access to it, as it provides forensic levels of editing the nuances of a vocal take.
But you could always just ask your vocalist to record some harmonies for you, to save yourself all that trouble!
-
Comping
Comping is an industry standard technique, and it’s finally in Ableton Live!!!! But what is it?
Every song in the charts that you hear will be an artificial amalgamation of that singer performing that song. This is because standard practice is to allow a singer to record the song as many times as possible, giving the producer take after take to comb through and find the best performances of phrases, words or even syllables.
The final performance, then, is Comped together, creating this artificial but perfect sounding vocal recording. Many DAWs have had this feature for years, so Live is admittedly late to the party, but a good technique is to set the song or verse or chorus (as relevant) Looping and allow your singer the freedom to do a few different passes of it. They may try different phrasings or subtle nuances that can totally change the sound of the vocals, and then you as a producer get to compile from all of these one super take.
It sounds a daunting process, and in honesty, it is, but the results speak for themselves. It follows logically that the best way to get a good recording of something is to record it several times over, but then taking it further and finding the best sections from each take is how to get professional sounding vocals.
These are just a few techniques you can use when you’re recording a vocalist to ensure you’re giving yourself as few headaches as possible when it comes to treating those vocals in post production. The philosophy is, if you get the best possible recording you can, then you’ll need to apply the minimum amount of processing. Obviously that’s a more theoretical statement, as no one is vouching for completely unprocessed vocals in your songs, but you get what I mean.
Now let’s look at another trick that we’ve briefly touched on here but I wanted to give it its own little section.
Vocal Doubling and Multitracking
What many producers may find when working with vocals is that compared to the musical arrangement they have going on, the vocals can sound quite thin. It can be tough to mix one single channel of a singer against a full track of music accompanying it. So how can we get around this?
Well, you’ve probably already guessed it, but by doubling your vocal channels!
This is a really easy trick to use to get your vocals sounding beefier, or just more present in your mixes. Simply duplicate the track your vocals are on, and then start from there with some gentle tweaking of the processing.
This is important. If you just double the track and leave it at that, you’re doing little more than making it louder, and that’s not exactly what we want to do. Afterall, if the solution was as simple as making it louder I’d just tell you to turn it up.
On your second vocal channel, experiment with some slightly different processing techniques than are present on your first one. Panning each vocal slightly out of centre is a good trick, because it gives the voice some spatial dimension within your mix. Though, take care not to over pan them, usually no more than 10-15 should do it, because you don’t want to take them out of the center of the listener’s attention, just pan them enough so there’s some good use of the stereo field.
So, in terms of processing, you could stick a very subtle chorus on one of them, or some slightly different Compression settings. There are no hard and fast rules here, so trying out some different techniques and seeing which sound best in the context of your music is the best advice I can give you.
Once you’re happy, group the two channels and then apply some general Compression and EQ to this group, so there is at least some dynamic consistency in your vocals. After all, we still want to create the illusion that it’s one voice singing, but we will use our production tricks to make it sound better in context.
Now, forget everything I said above, because there are some other really cool things you can do with Doubling vocals, specifically, going beyond just doubling them and multitracking them.
If you’ve read many of my articles you’ll notice I mention Bon Iver’s music quite a lot. They were a huge influence on my early musical development, and the vocal production Justin Vernon uses, especially on the first album, is really fantastic and is super fun to emulate.
Instead of duplicating a vocal tack so you have a double, record it again. Obviously if you have time constraints this may not be a super viable option, but if you’re recording your own voice you can do this as many times as you want. Layer 4 or 5 separate takes of the same vocal, and mix them all together.
You can also incorporate harmonies, those this isn’t absolutely necessary with this technique. Listen to Bon Iver - The Wolves (Act I and II) and you will hear that it sounds like a choir of individual voices. The astute ones among you will also notice he has multi tracked the guitar parts too.
This level of multi tracking works on more than just vocals, and it is a really good way to add some flair and character to a song that is -in the case of that Bon Iver tune- just a singer with a guitar. The layers and processing create a new platform for the song to shine, giving a new interpretation of the music than would be possible with one tracked guitar and a single pass of vocals.
In this way, it can be really rewarding to throw out the rulebook and do things that no one has ever necessarily told you to do, because there are no rights or wrongs within music production. The revolution in music production technology has made it so much more accessible, and democratised the process in such a way that now many people can and do record music that goes on to win awards in their homes, bedrooms, log cabins, living rooms. And much like we don’t need multi million dollar studios to create great music anymore, we also don’t need a rigid set of rules or guidelines. Obviously there are best practices we can learn, and studying the fundamentals of something is never a waste of time, but my personal philosophy on music production is that if the end result sounds good, does it really matter what techniques you used to get there?
_______________________________________
I think that is as good a place as any to call it a day for this article. Hopefully you’ve found it super helpful, and it’s actually been a good exercise for me to remind myself of these techniques because I don’t work with vocals anywhere near as much as I used to!
So as always, thanks a lot for checking in with us here at Top Music Arts, and please check out the rest of our blog and website for some really cool music production resources, I promise you won’t regret it!