Sound Design with Inspired by Nature: Vector FM
Posted by James Cullen on
So, in the first part of our collection of guides which focuses on the Ableton Live pack Inspired by Nature, we covered three devices. They were Bouncy Notes, Emit and Tree Tone.
Shout out to ELPHNT on YouTube for highlighting these devices and bringing them to my attention! It's a funny feeling when you stumble upon something that's been under your radar for so long, and I find it can trigger a frustration of wondering what else is out there that you're not aware of yet. But that's the beauty of music production; there's always something new to discover, waiting for you just around the corner.
So, as we mentioned in those previous guides, the Inspired by Nature pack is a collection of seven devices which create sound by emulating the way forces work in nature. We had some cool imitations of gravity and the way plants grow, and interesting uses of virtual particles in controlling how sound is emitted.
The next devices we are going to cover are all Vector devices.
These are:
- Vector FM
- Vector Grain
- Vector Delay
- Vector Map
We'll go over the ins and outs of each of these, covering their basic controls and operations.
But in this guide, we are going to focus on Vector FM.
Vector Devices
Inspired by Natures contains three vector devices - Vector FM, Vector Grain and Vector Delay. These all use the same particle system contained in a 3D visual interface as their focus on creating sound, where each particle is a visual representation of an individual voice.
Each particle's movement is influenced by simulated forces of gravity and magnetism, or the particles are sent through a flow field. You have direct control over the various parameters which effect the particle's movement, meaning you can get a wide variety of sounds from them.
- Gravity - in the context of these Vector devices, gravity dictates the attraction towards a body with a certain gravitational strength.
- Flowfield - this is a path based on directional forces which determine the particles' ability to move left, right, up, down and diagonally.
- Magnetism - this is a sort of pseudo-magnetism, as it's really based on each particle's charge and the gravitational attraction between particles, based on that charge.
You can tell just from reading the way these are described that they are going to be interesting ways of working with sound design, so let's go over the first device.
Vector FM
Vector FM is a granular FM instrument with a really unique modulation system. Before we go any further, let's take a moment to remind ourselves about what FM synthesis is.
FM Synthesis is synthesis where the frequency of a waveform is changed by modulating it with a modulator. So, using the amplitude of a modulating signal, we can change the frequency of an oscillator. FM Synthesis is interesting because it can create both harmonic and inharmonic sounds. We are taking a Carrier signal and then using a Modulator signal, to totally change the timbre of our sound, without the use of filters.
FM Synthesis can be quite complex, so if you're unsure at any point in our explanation of Vector FM, head over and read all about the basics of FM Synthesis. I found a good guide here.
Like all the devices in this guide, the sound in Vector FM is controlled by the particle system. You can see this in the image below on the left hand side of the device. The interesting thing about Vector FM is how it takes a relatively straightforward FM Synthesiser and puts the modulation in the hands of this unique particle system. There are a tonne of controls in Vector FM, so we will go over the main ones here.
A note before we continue, it's inevitable that we aren't going to cover every control in minute detail here, but remember, you can always click the disclosure triangle in the bottom left of Live's screen, which will give expanded info on anything you hover your cursor over! And this isn't unique to Inspired by Nature, this is true for all of Ableton Live.
Let's have a look at the controls.
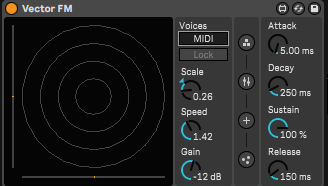
To the right of the device are additional controls, as well as four tabs which each open different sections of Vector FM, allowing precise adjustments of various parameters.
When you load it up in a new track, the ADSR controls are shown by default providing that you're in MIDI mode. This means that notes are created by incoming MIDI signals.
But the four tabs are where you really get into the fine tuning of things, so let's check out those tabs, and see how we can get into making some sounds with Vector FM.

The first tab is the Operators tab. If you've used Ableton's Operator, you'll be familiar with this. I've set it to run three operators for the purposes of demonstrating how it works.

- X Modulation - this allows you to control the depth of modulation applied to the selected parameter, and this modulation is controlled by the horizontal (or X axis) position of the particle.
- Y Modulation - the same as above, only the modulation is controlled by the vertical (or Y axis) position of the particle.
- Magnitude Modulation - this one sets the depth of modulation applied to your selected parameter, but uses the magnitude of the particle positions, which is the distance from the centre.
- Velocity Modulation - like the ones above, this controls how much modulation is applied to the selected parameter, but in this case the velocity (or speed) of the particle controls that modulation.
- Mass Modulation - finally, we have the modulation of your selected parameter being controlled by the particle's size.
So, in the dropdown menu underneath each of these controls each contain a selection of parameters that these controls can modulate. Using these you can get really creative with these controls, routing modulation to a variety of parameters within Vector FM.
What's cool, is that each note played into Vector FM creates its own individual particle, and these all apply their own modulation to the note. All of these controls can work together to get some really wacky results for your sounds.
Mass
So let's take a detour to talk about Mass.

Using the Force


- Strength sets the amount of force the vectors exert on the particles. Note that if the velocity is high, more strength is needed for the particles to closely follow the directions you've set.
- Moves and the three buttons below it control which charge or colour of particles the Flowfield applies force to.
- Size controls the resolution of the Flowfield, the higher the resolution, the more vectors there are, which results in a complex movement pattern.
Vector FM thoughts
Vector FM is a really unique instrument. It's possible to get super specific with the controls, and create a wide range of sounds from inharmonic spooky drones to more musical timbres.
The key to success with this is - of course - experimentation. Sort of like with physics in the real world!
There are countless different combinations of settings you can use within Vector FM, each of them creating drastically different results, so get messing around with it and see what you can come up with!
As always, thanks for checking in with us here at Top Music Arts, and be sure to let us know down in the comments if you've been trying out the Inspired by Nature devices as we've been covering them in our guides. While you're here, be sure to check out our deals on Ableton Live Project templates, which are a great way to learn how a professional level track is put together!