Sound Design with Inspired by Nature: Bouncy Notes
Posted by James Cullen on
I've been on a bit of a rediscovery tour of some of my music production techniques lately. Every now and then, a creative spark will ignite and you'll get a fire burning under you, and you'll just want to be creating or working on ideas in your DAW all the time.
It's a really refreshing place to be in, especially after the past few years which have made things really hard for everyone. There's been a lot going on, and despite us all having more time, sometimes it's been hard to use that time in positive ways.
Anyway, I've been really inspired recently by organic textures and lo-fi music. I've been highlighting a few plugins recently, and today I'm going to explore some sound design ideas in Ableton Live using a great set of free Max for Live devices called Inspired by Nature, which I discovered on ELPHNT's YouTube channel, he does a great overview of these devices which you can check out here.
This guide ended up being a bit bigger than I anticipated, so we are going to split it up into separate guides for each device.
In this first section we are going to cover Bouncy Notes.
So, let's get down to business, shall we?
Inspired by Nature
Inspired by Nature is a wonderful collection of Max for Live devices created in collaboration with Dillon Bastan.
They are a lovely set of plugins which allow playful creativity and produce generative soundscapes, unpredictable melodies and evolving modulations with devices inspired by physical forces in the natural world.
This sounds like a mouthful, right? But since I've been focusing on creating organic and textural sounds, this set of devices has been a perfect match for that type of creativity.
So what do you get?
Inspired by Nature comes with seven different devices for you to use. We'll cover each one individually in due course, but here they are:
- Vector FM
- Vector Grain
- Vector Delay
- Vector Map
- Emit
- Bouncy Notes
- Tree Tone
Each of these devices use different simulations of natural forces (such as gravity or magnetism) to influence how sound generation works within the specific device. The best way to explain this is to dive right into each one, so let's do it!

Remember, all of these devices are Max for Live devices, meaning you'll need Ableton Live 11 and Max for Live to run them!![]()
Particles
The devices in Inspired by Nature all use Particles to generate their sounds. You'll see below how each device does that in its own way, but it's a good concept to get your head around at this stage.
There are granular synthesis devices, where each grain is a particle, and the first device I'll list below called Bouncy Notes uses these particles as simulations of bouncing balls.
The point is, each particle represents one note of the sound source. Whether it's a MIDI note or an iteration of a sample.
You'll see this in practice in each device setting, so let's jump in.
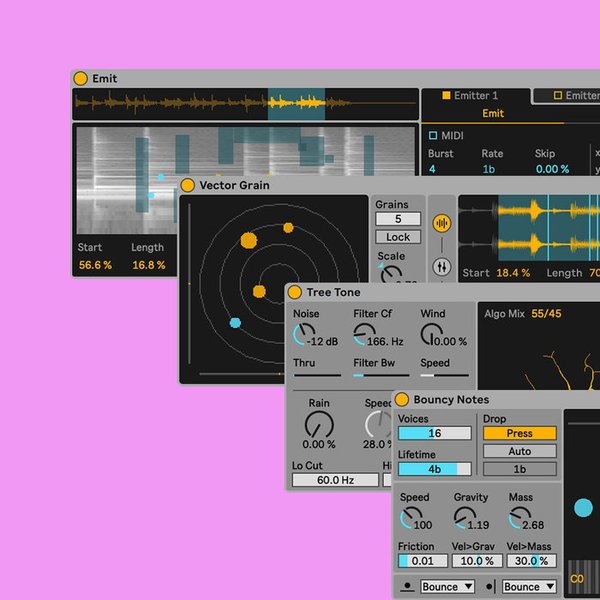
Bouncy Notes
The first device I tried from these is probably the simplest, it's called Bouncy Notes.

This one is a MIDI device which creates a sequence of notes using a simulation of bouncing balls. It's quite similar to an arpeggiator, in that you can play in one note (or a chord, or sequence of notes) and for each one you play, a particle is created. You then get a really interesting generative sound, and you can tweak various parameters within Bouncy Notes to adjust how the end result will sound.
In Bouncy Notes, each particle is a bouncing ball.
Each incoming note creates a bouncing ball, and the central display is where the balls will appear. You can see two in the image above. The ball bounces on the piano roll running along the bottom of the display, and when it no longer has enough power to continue bouncing, it's destroyed.

The gravity simulation is what controls the properties of the bouncing of the bouncy balls. There are three controls here which really affect the behaviour of the balls; Gravity, Mass and Friction.
Simply put; higher Gravity and Mass means the ball will fall faster, and bounce lower. Lower Gravity and Mass means the ball will fall slower, and bounce higher.
Both Gravity and Mass of each ball can be effected by the MIDI velocity of the incoming note.
Friction reduces the effect of Gravity over time. If this control is high, this means it will slow the ball with each bounce, resulting in fewer bounces each time.
There is also a Speed control, which controls the overall speed of the Physics controls on the balls.
There are various factors which control the creation of new balls. One of these is, as we've discussed, when a MIDI note is played. However, you can also set Bouncy Notes to create balls automatically. This is where the real Generative potential comes in for Bouncy Notes.
The image to the left is the section that controls how balls are created and destroyed.
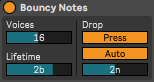
As you see, the Auto option is enabled, which means balls are created at regular intervals. The slider below this is the Interval Control, which controls how often new balls are created. I have it set to half notes.
Over on the left side of the controls, you can see the Voices option. This dictates how many balls can be present at one time, and the Lifetime control dictates how long a ball will last once it has been generated. The lower this is, the shorter a ball's lifetime, and it may stop existing before it even hits the piano roll. The opposite is true for a higher lifetime value, the balls will stick around for much longer.
So, we've covered the basic controls of the creation of bouncing balls with Bouncy Notes, but you may have noticed in the first image that the piano roll running along the bottom contains all of the notes of the piano.
This can result in rather inharmonic content, which - while it sounds cool - isn't always super musical. So the next tip will help you use Bouncy Notes as a kind of generative sequencer.

So, in the image to the right, you can see the little Piano icon next to the Drum Rack control has been toggled, whereas in the first image of Bouncy Notes, it is greyed out.
This then opens the Scale Settings menu which allows more harmonic control over the notes.
You can see that I've opened the menu which contains many different types of scales, and the Tonic dropdown next to it allows you to choose the starting note. So mine is running in Dminor. You can also set the Range control, which dictates how many notes above the Tonic will be included in note generation.
The wonderful thing about Bouncy Notes is the level of control over pretty much every aspect of the sound design process you have. Up to this point, we've created a sequence of automatically generated notes, running in Dminor.
Now, if you want a more organic and soundscape-esque sound, you can leave the note generation to a more random pattern. However, you can also quantize your notes so they are generated more rhythmically.

You can see the Quantize control on the left here, let's also run down an overview of what each of the controls on screen here do.
The Velocity Fade control sets the amount of volume/velocity decrease applied to the note out's velocity each time its associated ball bounces. This is done on a percentage value, so if set to 10%, the note's velocity will reduce by 10% each time the ball hits the floor. If it's at or above 100%, the ball is removed.
Note Length sets the length of the notes. That's a surprise! When a ball touches the piano roll, the length of the note produced is determined by this control. If it's in Auto, as we can see here, each ball will use the length of the incoming note that triggered it. If there hasn't been an incoming note length set, then a random length is chosen based on the following parameter.
Rnd>Len is the Note Length Spread control. This simply sets the amount of randomness applied to note out lengths.
Rnd>Dir stands for Randomness and Direction, and this controls how much randomness is applied to the direction of the drop for each note. This one creates dynamic horizontal movements, meaning you can make your notes bounce sideways - even off the walls of the box before they hit the piano roll.
Speaking of Horizontal Movement, there is an orange slider across the top of the main interface, which skews the preference for the direction the balls will bounce. If set to the left, balls will naturally bounce towards lower notes, and set to the right, they will bounce towards higher ones.
The Vel>Height controls the amount that the note in velocity affects the drop height of a new ball.
There's also a Filter button, which -when enabled- omits incoming notes that are not on the piano roll's defined scale. This means that if a note is played that isn't in our key of Dminor, a ball will not be created for that note.
The Freeze control is the button next to the Filter, and simply freezes the physics and auto ball dropping.
Bouncy Notes is a great plugin because you can use it for a variety of purposes. Using Auto mode to automatically generate notes can give some really interesting results, but you can also use incoming MIDI notes to generate nice movement on chord patterns or melodies. Each incoming note triggers a ball, and you can use the controls we've covered above to dictate how that ball behaves.
I've been using it for only a couple of days at this point, but I am sure it's going to be one of my go-to plugins for creating nice textures in my music!
It's all about those little Particles.
Using Bouncy Notes, I have discovered many new ways to incorporate creative sound design into my productions.
The wonderful thing about the unique particles system is that it adds in a level of randomness; creating generative patterns that sound inherently more organic and textural.
This can be perfect for certain types of music, but it's by no means limited to any one genre. The great thing about generative, organic patterns is that they help get rid of the rigid and non-human qualities that electronic music can often have.
And this is an inherent quality in the Inspired by Nature pack for Ableton Live. As the name suggests, it incorporates natural and organic sounding timbres into your music, allowing a wonderful influx of three dimensional sounds to help add to your overall sound.
This pack contains seven wonderful devices, and over the next few posts on our blog we are going to be going through each of them in detail, giving you an insight into how they work and how you can take their systems and use them within your own production.
Let us know down in the comments if you've tried out Bouncy Notes before this, or if this guide inspired you to give it a go. And as always, be sure to check out our deals on Ableton Live project templates, which are a great way to see how professional tracks are put together.
Thanks for checking in with us here at Top Music Arts!