How to make Future Bass in Ableton Live 10
Posted by Esteban Miranda on
Are you new to producing Future Bass?
Today with Top Music Arts we bring you a tutorial, where we’ll be showing you how to make the key elements of a Future Bass track (drums, chords, melodies) and always giving you all some essential tips along the way. To help you all in the way of composing these amazing music genre.
We won’t be diving too deep into the mixing or sound design aspects of the synths, for example, because it can be a bit too broad for only one blog post. And we also prefer to keep it simple for those who are new to music production too!
Over the past few years, Future Bass has been a genre with tremendous growth, with a massive rise in popularity. World-famous artists such as Flume, San Holo, The Chainsmokers, Illenium, and Marshmello have all been catalysts to its rise and continued success.
With no signs of slowing down, this melodic super saw-filled genre is assured to continue taking over the dance music scene.
If you´d like to know more you can check out one of our previous article about all you need to know of Future Bass and the most used keys here.
So today we bring you all a list of simple essential steps for producing Future Bass that we hope will help you all to start your own music projects!
We´ve started it with a BPM of 160 (80) and a Time signature of 4/4 (most used time signature in all genres of EDM).
Here you can listen to the section we are going to be looking more in detail:
Let´s start from the base…
STEP 01 - The KICK DRUM
Generally, we start the production of a new track by choosing the right Kick Drum Sample for your song. This task can prove to be difficult sometimes, and maybe take too much time for most people. You can find a various array of kicks in modern future bass tracks, soft, snappy and those that even sound more “natural-like”. This is a heavy kick sample of our choosing.
For a very loaded low-end track, like this one is going to be, you should pick a punchy and short sample with a sharp attack, so it can cut through the mix, enough to be heard between all those low synths!

We recommend you to have a reference song you like (of the same genre) to pick similar sounding Kick samples and move on.
Here we have our Kick drum pattern:

As you can see, this is a pattern of 8 bars. First I did a 4 bar pattern, but to avoid the classic and over-exploited 4 to the floor, I left the 1st and 3rd bar on the beat and changed the 2nd and 4th. Then I copied the pattern to make it last longer and have room for of the instruments; So they can, at the same time, add changes to the whole idea.
We’ve picked a balanced sounding kick sample in wav, so let’s keep it the way it is without any unnecessary processing.
 Always try to choose good quality samples (WAV, AIFF), it just makes your work easier.
STEP 02 - The Snare Drum
Next step here is to add a layered Snare that will play a basic pattern too. Here the sample is sounding pretty good by itself, without unneeded lows, and as snappy as you can get! I´ve only added some reverb. We recommend you to have this in mind to blend it easier with other snares, toms or claps you might add later.

This is also an 8 bar pattern. I made It hit on the second beat of each bar to keep it simple and then changed the 6th bar a little, to make it more interesting.

You can change the Track delay to add some groove and human-like feel. We recommend you to do this only to instruments you feel too stiff or maybe too sequencer-like. You should not use this trick a lot because you might end up delaying all your tracks. Take a look at how to do it:
STEP 03 - The Hi-Hats
To continue building the beat and give the subdivisions some shape, I´ve picked a simple Hi-Hat sample, tweaked it a little, and added an Arpeggiator for that trap-like sound. Here are the settings so can check them and understand the midi sequence.

I automated the Arp Sync knob to make 16th notes for almost two bars, and in the second bar, I added two hits making 48th notes to add some life to the groove we have so far.


And also I duplicated this two bar loop (with the automation) to make it last 8 bars as the other loops. We recommend you to do the automation this way, so you don´t have to draw it 4 times!

These hi-hats didn´t need much processing, so I added some Reverb and a little Ping-pong Delay to help them spread more and make them stereo keeping them off the middle.
STEP 04 – The TOMS
The final percussive element we are going to add to this beat, for now, is a Tom Fill that we’ve made using three simple tom samples.
I made two phrases, one at the beginning of the 1st bar and one on the last bar (8th bar). Have in mind that there is a silence in between. I recorded in my MIDI controller because I like the changes of velocity in my drums.
Here is the Tom track pattern (mind the silence in between phrases):

I added some Reverb and Ping-pong Delay to the track so it blends in as well.
This is how the complete Drum Beat sounds like:
STEP 05 – BASSLINE
We started with a simple chord progression for a 4 bar loop:
||: Am | F | C | G :||
The bass here is playing the Root note of each chord mostly. But since we are making 8 bar loops so far, for the second 4 bar loop, in the first chord the bass is playing another note of the scale (D), making it sound like what we would call an Inversion.

Any of the component notes of a chord can be reshuffled in any order. It will still remain the same chord but it´ll no longer be in Root Position (the root is determined by the lowest note). When you change this lower note, you make a Chord Inversion.
Because the Future Bass genre has a lot of fancy big open chords going on, and to make it more interesting.
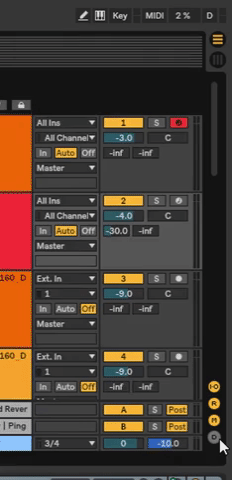
For this specific bass sound, we´ve used Ableton Live 10´s Wavetable preset called Post Bass, with a nice Sub sound, and some Wobble action as well. Later, I also added an Eq Eight to filter some unwanted frequencies, and a Pedal (new live10´s audio effect) for some distortion to make it sound more crisp and compact.
Here you can have a look in detail to the track´s device chain:

Here you can listen to how the Bass with the Drums sounds:
STEP 06 - The Chords
The type of chord you choose and it´s Voicing both are very important because you can use them to cause the emotion you want your listeners to feel when they hear your song.
We’ll try to describe this part as simple as possible without going too deep into Music Theory. Also if you have any doubts, you can leave us a comment below and we´ll try to help!
Generally, the Bassline melody always serves as a “floor” for us to build our Chords pattern layers up.
This case is not an exception, but with some inversions, to make it not boring.

For this instrument, we used live 10´s Wavetable again, but with an electric keyboard sound, I made(similar to a Rhodes). Very clean and clear for the voicings to shine. Later I added some Autopan to make it spread more and blend better with the other layers, and an Eq Eight to filter the low frequencies we don´t need. Here, you can take a look at the chain:

As we add layers to our compositions, we may need to change the chord progressions, maybe to add more complexity like in this case, in order to make a future bass song, you´ll need some elaborated chords and voicings.
That’s why I changed the main progression a little.
If you want to know more details about chords and chord progressions, you can check one of our previous articles talking all about them here.
Using a simple triad (3 notes) chord in the future bass genre will just not cut it, you need to make more noticeable chords, and a good way to do it is by simply extending your chords.
For example, using the ones in our progression here, if you have an A minor (notes: A C E), you can play a simple triad and extend it by adding more of the same 3 notes you have.
Basically, what you do is to get a set of notes with which you can play moving, or duplicating octaves of those 3 notes, to add upper or lower tones. Playing around with different notes and octaves using this technique can help you achieve more “complex” chords. Something like this:
By applying this trick, you will get a much fuller and richer sound. This is a very simple but invaluably useful technique for those of you who aren’t familiar with music theory. This can be done with ANY chord to get a larger sounding result that will always stay in key.
Adding notes to simple chords always works for me, like the 7th, 9th, and even 11th tones. We recommend you all to try these out as well.
I went back to my chord progression and made some changes.
I took my major chords and changed them to Maj7 just for some extra flavor in the chord progression. And then added the 9ths to the F and C.
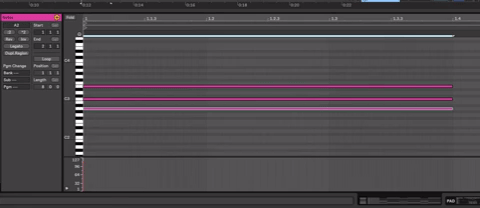
Here are the chords of the first 4 bars:
||: Am7 | FMaj7 9 | CMaj7 9 | GMaj7 :||
Then in the second 4 bars of the loop, I added some changes to the harmony. By just changing the first bar chord to Dm7, with the bass remaining the same so it makes it sound like an Inversion. And added one chord to the last bar with an Am7 with the bass note in E (another inversion).
Here are the second 4 bar´s chords:
| Dm7 | FMaj7 9 | CMaj7 9 | GMaj7 Am7 :||
Now that you know what chords the "Rhodes" plays you can check the rest of the chords layers we have here. Also, have in mind that in each capture of the MIDI notes you have every chord´s note so you can use them in another order or another key.
Here is the next chord layer, similar to a Bell sound:

Pay attention to the notes because they are not playing the same notes in the same octave, I shuffled them around between the tree chord layers we have here. This sound was loaded with a lot of unwanted lows but with an Eq eight, some Reverb and Ping-pong Delay it blended in with the rest with no problem.

The final layer I added is a sound similar to a Saw, in this layer I repeated a lot of notes of the rest of the layers, but with a stab-like sound.

Try out different extended chords like this and make sure to use quite long note lengths with your chords, as this will really allow you to give them movement, by using the Envelopes and LFOs in Wavetable.
For this sound (that it´s named saw but it sounds more like a Stab), I used an Eq Eight and filtered the Lows and also some of the Hi frequencies to have it somewhere in the center, but not taking the whole place. I added Reverb and Ping-Pong Delay, but I also added an Autopan, in a sort of side-chain way.

Now that we´ve described the Drums the Bass and the Chords, we can move on to the melodies...
But first, have a listen of what we have so far:
Step 07 - The Melodies
For the melodies, your limit is your own creativity. In a way, all tasks in a composition are like that. What I mean is that with this kind of layers, vocal synths, vocal singing, vocal chops, melodic elements like saws, bells or stabs you can be more free and original
we have two Wavetable synth sounds, one with a sound similar to a Saw (yes, another), and other more similar to a Stab.
I did two melodies that played at the same time, add some kind of movement to the song.
The first instrument playing a melody I created was the Stab, another Wavetable synth instrument, playing the first melody in harmony with the next instrument.

For this sound, I browsed through some of the Stab and Bass presets, because sometimes the bass synths have some nice high sounds. And ended up coming up with something like a stab. I played with the pitch wheel of my MIDI controller and came up with some dynamic variations I liked.
To make the sound stand out a little I added a Pedal audio effect, with a Fuzz distortion and almost no treble (the synth was already to loaded with hi frequencies). Then I filtered out the lows with an Eq Eight, added some Reverb and Delay as well.

The second melodic instrument to describe to you here has a sound similar to a Saw type, the second one, so we´re going to call it Saw2.
This melody is playing the other part of the harmony between them. It´s not a big thing but a simple change of intervals between notes and some complementing to the first melody.
Those two elements can prove to be really useful when making vocal tracks.

This is the last Wavetable I used for this track, with an ascending pitch saw type of sound. I did some adjustments to the envelopes and LFOs, so it moves at the right time. Then I filtered out some of the low frequencies I didn´t need with an Eq Eight. I also added later some Reverb and Delay.

 You can record yourself or a singer vocal singing version of the melody you would like to be played (even yourself humming!) and then convert that recording into a Melody in a new MIDI track. With only Right-clicking your Audio clip and selecting that option.
Step 08 - Final Touch
Next, we have the last part of the process, I always try to hear what the track is missing. Maybe as a help, you can take a song you like as a reference.
We recommend you to pick 2 or 3 songs of the same genre you are composing, and drag them into an audio track and have it muted, only for listening to take reference.
The first thing the song was missing was a Vocal Chop, maybe the main ingredient in any good Future Bass recipe.
So I added a sampler and dragged in an old vocal chop sample, then with some pitching, Reverb, and Delay, I started adding rhythmic hits, playing a lot with the bouncing of the ping-pong delay.

For this track, I tweaked the sampler a bit, added some AutoPan for the stereo spread technique, then filtered out a lot of the lows, and added a little reverb and delay as you can hear.
Here you can take a look at the chain of this track:
After that, there were sections that were missing some atmospheric effects, so I added a Raise sounding synth and a rise down, samples.
Finally, here is the finalized section, let´s hear it:
Remember to always rely on your ears and your own personal taste when you are making this kind of decisions.

If you are not much into Sound Design yourself, here are some guidelines that might be useful to have in mind:
Even though some future bass sounds are complicated to make, their wavetables are always super basic. You only need Sine, Saw, and Square for almost all of the sounds. Use them as a starting point.
Use LFO's not just to modulate the volume and filter, but try it on the mix of different effects or other knobs. Like you would do for making evolving sounds.
Try not to use too much Modulation with LFOs, instead, I heavily recommend you to modulate through automation. You may find that you make random rhythms by accident that ends up sounding really nice and a lot better than the usual repeating LFOs.
Look at synth tutorials for future bass presets, you'll be surprised by how much you can actually learn from them in general synth design.
We recommend you all to don't always use presets, or at least always change them a bit so you don't end up sounding like everyone else (except for the times you are actually looking for that).