Advanced Drum Production Techniques Part 2
Posted by James Cullen on
In the first part of this guide I took you through the first steps of creating a drum pattern using my advanced drum production techniques. These are tips and tricks I've learned through experimentation and trial and error, and I'm passing them on to you because they have helped me create better and stronger music with really good drums.
If you followed the steps in part 1, you should have a drum pattern that looks a little something like this. Don't worry if you haven't followed mine exactly, as the concepts are applicable either way!

We've got a Kick, Hats, Snare, Clap, Crash Cymbal and Tambourine. These complete the first three categories of drums I mentioned in Part 1. In this guide, we are going to be looking at the other categories.
These are..
- Effects - We didn't cover effects in part 1, but these play a vital part in creating advanced drum beats. We will cover Compression and Delay in particular.
- Longer Progressions - In part 1, I mentioned how we can use progressions to make our beats retain the listener's interest. The Crash and the Tambourine formed part of this; we will use more rhythmic hits and progressions to advance the drums.
So, going back to our drum beat, the first thing we will do now is duplicate the loop, and then create a small arrangement. Once we've completed the steps in part 1, what we have is the basis of our drums. However, we now have to start thinking in the overall context of the track, so the arrangement has to come into play.
So, you should have 8 bars of your loop. Move this so it begins on bar 8, and then create an 'Intro' using some of your elements. Sometimes you may want to start with the kick, other times you may want to bring it in later. There's no right or wrong, so just experiment. As a reference point, here's what I have.

As you can see, we've moved the full arrangement to begin at bar 8, and used the hi hats on their own to begin, as well as a crash cymbal. Bar 5 introduces the snare and clap pattern we made, and then we get to Bar 8.
So, let's look at the steps we can take to make this beat more complex. For clarity, I will keep the tracks and audio parts we made in part 1 as Pink, and then add anything new in Green.
Building on the foundation.

The first thing I've done is added a Replika delay to the crash cymbal that starts the track. I've used a dotted 1/8 note, delay time with a relatively low mix and feedback. This just adds some character and atmosphere, and that's what is most important to bear in mind at this stage. If the beat we made in Part 1 was the foundation, we now need to think about building upon that to create more interest.
You can use delay on one shot percussive or melodic hits to really add space and interest to your arrangements. Try adding subtle levels of delay to things like your snare or clap phrases too; really low in the mix so as to not be overbearing, but present enough that you can hear the difference.
The easiest way to build more interest in your music is to think of the individual parts or individual occurences of a sample. Bear in mind your progressions, and apply any necessary effects too. You could have a super delayed booming sound that only occurs twice in the entire track!
To return to our example, you'll see that as well as adding a Delay to the crash, I've also duplicated the channel to use a reversed crash sample, as you can see below.

The main things to note here are; the automation on the Pink Crash channel. I decided I only wanted the Delay to play on the first cymbal of the track, so I automated the mix of the Replika plug in to reach zero by the time the main beat comes in.
Also, the reversed crash. I've done this by duplicating the track and reversing the audio sample. You can do this in the Clip Editor by selecting the 'Rev' button, you can find this in the same panel as the Transpose, Detune and Gain controls, as shown here.

You can see that the new reversed crash cymbal plays just before the original, which plays a similar role to a white noise riser in a lot of dance music. It provides a moment of anticipation; building up to the next section. This is of course key to the point we covered about progressions. Using a reversed cymbal every 16 or 32 bars to denote changes in sections seems like a simple idea, but it can drastically change the overall vibe of a track by adding that subtle level of build up.

Bear in mind, that this is just an example of how you can do this. Obviously you don't have to add a reversed Crash cymbal every time, there are a tonne of ways you can implement this little reversed technique. Other percussions samples, atmospheres, melodic elements, it can sound good on anything, so experiment!
Adding Character.
Now, some producers have their own personal producer tags which play in all of their tracks. Sometimes it's appropriate to have this level of character and personalisations in your music. In genres like trap, for example, where the rapper and the producer are two separate artists, it's a good way for the producer to ensure their music is recognisable as specifically theirs.
"If young Metro don't trust you, I'm gon' shoot you."- Future, at some point.


Inserting Silence.
You can refer to the technique I mentioned above as 'inserting silence'. Think of silence as an equal tool you can use in your music, as powerful and useful as a kick drum sample. You can almost imagine it as a sample of silence in a sample pack.
So, to illustrate this concept, I've edited the section of drum arrangements from bar 17 onwards. As you can see below, the snare and clap pattern drops out at bar 21, and then the top two hi hat parts also drop out at bar 23. What this does is strips down the arrangement one part at a time, doing the opposite of building one on top of the other. It removes an element at a time, and it serves as a 'build up' of sorts; providing a sense of anticipation moving into the next section.

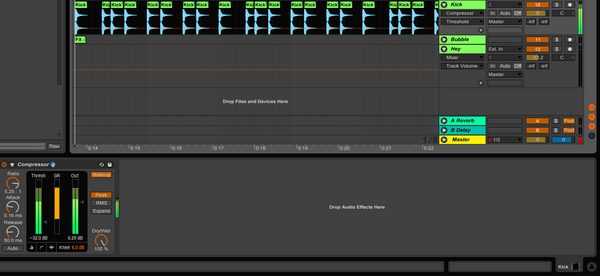
Now, as I've repeatedly mentioned up until this point, we need to think about our overall arrangement. This section now sounds perfect to build up to a 'drop' of sorts. There's space, anticipation and the right level of layering. So now what we need to think about is going back over what we have and seeing if anything needs tweaking. You can do this while you apply compression to your drum parts; as you hear them brought to life by the compressor, you can also imagine them in the final arrangement. I find that compression helps by making them sound more 'produced' and finished, so if there are any glaring issues, or you want to try some rhythm variations, it's a good time to experiment.
Compression.

Final Thoughts.
- Created a complex drum arrangement, using variations of dynamics and velocity.
- Used structure to create different sections, bearing in mind the 'Insert Silence' concept. Have you tried dropping your kick out for a bar?
- You should have applied some effects and some one shot hits to your arrangement, maybe even a producer tag or a signature sample.
- Finally, added the right levels of compression to bring your drums to life and add weight and punch to the arrangement.
Now, you can use these techniques as a framework to create more complex and advanced drum patterns. Practice doing this to make sure your music is constantly improving, and now use the project we've just created to try and make a track!
Thanks for checking in with us here at Top Music Arts, as always, we appreciate you taking the time to learn with us. Don't forget to check out our great deals on Ableton Project templates, and keep an eye out for some cool new content in the future!