Sound Design with Inspired by Nature: Vector Grain & Vector Delay
Posted by James Cullen on
Hopefully you've stuck with us through these recent guides. Originally it was going to be one guide, but it became clear that it would take up way too much screen space.
The devices contained within the Inspired by Nature pack are all fantastic and interesting devices, which have already added many new ways for me to make music. Hopefully the same is true for you!
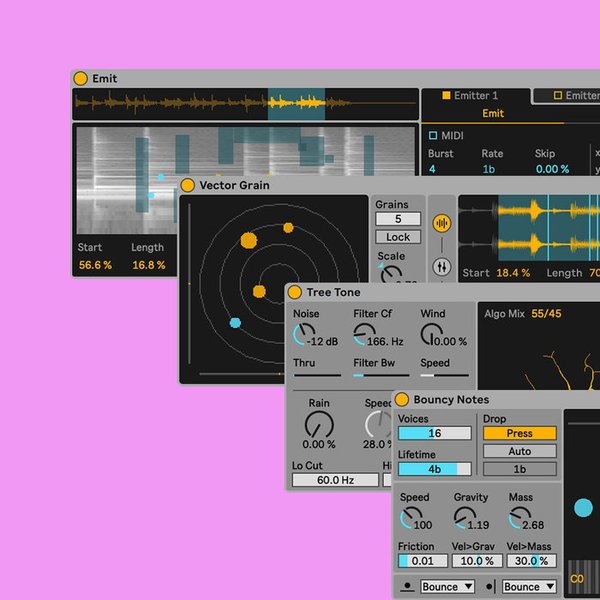
Whether you're creating generative and evolving patterns with Bouncy Notes, getting weird with samples using Emit, or making some more avant-garde sounds using Tree Tone or Vector FM, there's something in this pack for everyone!
So far we've covered four of the seven devices, so in this guide we are going to take a look at Vector Grain & Vector Delay. Both of these work very similarly to each other, and indeed to Vector FM too. But we will go over them here.
Remember, if you need a reminder on what the Inspired by Nature pack is, be sure to check out our guide on Bouncy Notes, which includes an overview of some key info which will help you decide if this pack is for you!
So, let's look at Vector Grain first.
Vector Grain
Similar to Emit, this is a device which will be using samples as the basis for its sound creation.
Live describes Vector Grain as a 'granular looper', and it can also be though of as a polyphonic sampler.
Like Vector FM before it, it uses the same two dimensional particle simulation to control how the sounds are shaped. In fact, all of the Vector Devices are based on the same simulation, so once you get familiar with is, you will be able to apply that knowledge over to each of the devices.
In this guide we will take a detailed look at some of the controls you can use within it, as well as some cool ideas for how you can use it.

Vector Grain looks - and works - much like the previous device we covered, Vector FM. So this may be a considerably shorter guide, as it shares a lot of the same controls, and the same particle based modulation system.
The controls on the main screen are the standard ADSR controls along the right hand column, as well as a few more controls for the particles down the left.
These are:
- Scale - this scales the positions of the particles, which will affect the ranges of their modulations.
- Speed - this controls the speed of the physics. Remember, this device is using emulations of real world physics, so this control dictates how quickly or slowly those physics act upon the particles.
- Gain - this one is standard, it controls the gain for the final output of the device.
On the top of this section we have a couple of buttons.
- Grains - this sets the maximum number of grains / particles active. If Emit mode is on, then these are the maximum number of particles it can have emitted at once before voice stealing occurs. If this is set to MIDI, it means Vector Grains will use MIDI input to create particles, but you can automatically generate them by selecting a number up to 16.
- Lock - when enabled, granular playback and particle emitting won't occur unless Live's transport is running. This one is great for avoiding headaches!
So, the interface shares a similarity to Vector FM, but the main difference here is that Vector Grain uses samples as its sound source, whereas Vector FM uses FM Synthesis. So in Vector Grain, each particle represents an instance of the sample playing, rather than operators as was the case in Vector FM.
So, the first thing you need to do with Vector Grain is drag in a sample.
Once you do, the Sample Settings tab will open.
Sample Settings

This section allows you to control various parameters of the sample, as well as some options for live recording. When the device is in MIDI mode, playing a note will trigger a looping section of the sample.
Once you have a sample you like, you'll want to navigate to the Grain Parameters tab, where you can get into some interesting adjustments of how the sample playback works.

- Start - this controls where in the sample playback begins. So at 0%, you're starting from the beginning of the sample. The higher you go, the further along the sample the playback will start from.
- Size- this controls the size of the looped section of sample. This can be set to synced note lengths, to get more rhythmic patterns which will sit nicely with the tempo of Live, or you can use milliseconds for some interesting results.
- Fade- this control applies a fade to the beginning or the end of a loop, which is controlled by...
- Fade Center - when this control is all the way to the left, the loop will fade out, and when it's all the way to the right, it will fade in.
So we've seen above, the range of parameters and controls you can adjust to affect the playback of your samples.
Vector Grain works very similarly to Vector FM, and there is a lot of similarity in the controls. There is also a Particle Settings tab, which lets you adjust the qualities of each particle.

Overview
The previous device we covered was Vector FM, and this one - Vector Grain - works much the same way. One of them is using FM Synthesis for the source of the sound, while the other is using samples.
The particle system included in Inspired by Nature is a really interesting approach to sound design. It uses a very novel idea to create some weird and wonderful sounds, giving you a tonne of possibilities for creating and manipulating sound.
So far, we've covered one MIDI effect - Bouncy Notes - and a couple of synthesisers and samplers. We're now going to cover Vector Delay, which applies the same particle system to a delay setting.
Vector Delay
Vector Delay uses the particle system we've become very familiar with to generate a delay, here, each particle is a delay line.
The bottom two tabs on Vector Delay contain controls for the particles, which we've covered in detail for the other plugins, so we won't go over in too much detail here.

The first tab contains all of the standard controls you'd usually find in a delay control. You have the time, as well as the feedback. The Time can be set to rhythmic intervals as well as milliseconds.
There's a Pitch control which allows you to pitch shift the delayed signal, and the Recycle button sends the repeating signal into itself, which causes a rising cascade of repitches.
If you hit the Reverse button, it reverses the repeats.
There are the five vector controls along the bottom of this tab, which we are familiar with by now, each of which assignable to automate a parameter within the device.
You've also got Pan and Gain controls, and a Filter on the right hand side.
Vector Devices
The devices which all use the particle system offer a really unique and interesting way to approach sound design.
Vector FM, Vector Grain and Vector Delay all use it in unique ways, each giving different sonic results when you adjust parameters.
As a final mention, there is a device called Vector Map, which simply allows you to use the particle system and map it to any automatable parameter within Ableton Live, you can see this picture below.

On the left we have the familiar particle system, and on the right is the mapping controls for how each one interacts. Vector Map is a very cool, as it takes that particle system and unleashes it onto Ableton as a whole, allowing you to use it to get some really interesting results. The possibilities here are virtually limitless!
Inspired by Inspired by Nature
Inspired by Nature is a perfect example of a product doing exactly what it says on the tin. This is a superb collection of devices, each of them bringing a novel and exciting aspect to sound design and music production.
I've already made and finished several tracks using Bouncy Notes and Emit, which I have to say are my favourite devices out of the entire pack.
Let us know down in the comments what your favourite device in the Inspired by Nature pack is, and if you've been using them in your productions!
As always, thanks for checking in with us here at Top Music Arts, and be sure to check out our deals on Ableton Live Project Templates while you're here. Our team of international producers work tirelessly to create professional sounding recreations of some of the biggest tracks in the electronic music world, and you can grab these and dig into them to see all of the techniques for how a chart topping hit is built from the ground up.