Learning Synths with Ableton
Posted by James Cullen on
Synthesis is a crucial part of modern music production. Gone are the days where the DAW was just an audio recorder, and a synth was an analog keyboard or piece of gear that plugged into the desk like every other instrument. Nowadays, synths are built into all DAWs, giving you hands on control over sound creation from the moment you open your computer.

I acknowledge the privilege I’ve had in that I have a degree in Music Production, so synthesis was a topic we covered extensively during my studies. However, not everyone has this luxury available to them, and many producers start out as a hobbyist. If this is the case for you, where can you go to learn synthesis in detail so you are making the most out of the resources at your disposal?
For some, it’s good old book learning, for others, it may be youtube tutorials, of which there are plenty. If you use Ableton, however, you’re in luck, because they have launched a dedicated website to teach you everything you need to know about synthesis.
So, today with Top Music Arts, we will explore Ableton’s Learning Synths website, all its features, and how you can use it to further your progress as a musician and producer!
Learning Synths

Learningsynths.ableton.com opens with a welcome page, with the delightfully simple message ‘Get started making sounds’. One of the things I love about Ableton’s literature is the simplicity of it, because at the end of the day, while you can talk about synthesis in a myriad of complicated and technical terms, all you’re really doing is making sounds.
So, there’s a fun little box with a blue dot sitting inside, and if you drag this around, you instantly hear a very low and growly bass synth. Dragging the dot to different corners of the box creates differences in the timbre, and you’re prompted to listen and explore how these changes sound.
The basic premise here is that you’re controlling a synth, and in a very simple way, you’re making very different end results by sculpting the original sound, which is essentially what synthesis does. Different controls on a synthesiser control and change different aspects of the sound. Some control individual elements, while other controls change the entire sound in a big way.
Note that no prior experience OR equipment is needed to learn from Learning Synths, as everything is done in the browser window itself. Already, it’s a great resource. Let’s jump into the synthesis basics!
Getting Started: Amplitude and Pitch

The first sub section on the website is called Getting Started, and it gives you some information and fun little games to explore Amplitude and Pitch.
Simply put, Amplitude is the measure of how loud or soft a synth’s sound is. The site gives you a handy little slider with another dot on, allowing you to drag it and hear how the sound increases or decreases in amplitude.
All synths have an amplitude control, which controls this parameter alone. Increasing it makes it louder, decreasing makes it softer. The volume controls on your phone or computer are Amplitude controls, it says.
Pitch, is how high or low the sound is. We’re given a slider on the site, and dragging the dot up creates a very high pitched sound, while dragging it down creates a super low one.
Pitch controls aren’t unique to synthesisers, though. Every musical instrument has a ‘control’ to allow you to change pitch, they just come in many different forms. On a Piano, it’s the keys. The left keys are lower, while the right are higher. On a guitar, it’s the fretboard. What sets synthesisers apart is that they can create a much wider range of pitches than any acoustic instrument, from the very lowest to the very highest!
We’re then given a similar box to the opening page, but this one controls amplitude and pitch. This kind of box is common in Ableton, and it’s often called an X/Y matrix or something similar. Essentially, one control is mapped onto the X axis (vertical) while the other, the Y (horizontal). So moving the dot on this synth game changes amplitude and pitch, similar to how a Theremin works!
Synth Basics

The next section is an introduction into other aspects of synthesis. The first two sections focus on how some synths have a physical keyboard attached to them, so this is how pitch is controlled. Not all synths have keyboards, however, so this is definitely an important distinction to make!
Then follows a section exploring the controls on a synthesiser, such as Brightness and Movement. There’s a slider for each of these, and you can hear the sound change as your play with them. All synthesisers have a range of controls to sculpt the sound, and this is a small introduction to this concept.
Then you’re introduced to the concept of changing many aspects of the sound at once, with another X/Y box to mess around with, and after this you’re taken to yet another page titled ‘What can synths sound like?’
This allows you to hit play on a looping pattern of notes and drag the X/Y box around to shape the sound in a variety of different ways, giving you an insight into how the synth can sound different. There are several additional boxes like this, showing you how sounds can change in various ways, such as slow mellow sounds, sound effects like sirens and sci fi robots, or drum and percussion sounds. All of these are possible to recreate with synthesis.
Once these core concepts are covered, the site takes us a bit deeper into the specifics, so let’s have a look!
Envelopes
No, you aren’t sending a letter, you’re controlling a sound!
Envelopes are everywhere in synthesis, they can control a range of different aspects of the sound, but what are they?
An Envelope creates a change of the synthesiser’s characteristics over time, and the user can set the shape of the envelope in order to affect how this change sounds. Learning Synths characterises this as ‘a change over time’ and allows you to draw in an envelope, and hear how the pitch of the sound changes over time.
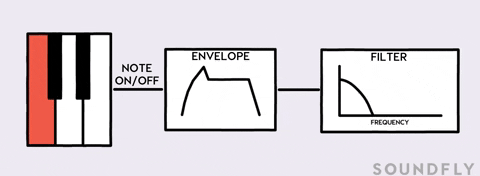
So the basics are, synthesisers use envelopes to create shapes. These shapes then tell a specific aspect of the sound how to behave. You don’t hear the envelope directly, however, you hear its effect on whatever parameter it’s been assigned to change. This process of the envelope changing another aspect of the sound is called modulation, and is a key term when it comes to synthesis.
ADSR
The basic controls of an envelope are: Attack, Decay, Sustain and Release, often abbreviated to ADSR. You’ll see these everywhere across synthesisers, as well as other devices. A Compressor, for example, has Attack and Release controls.
They work like this:
Attack - An envelope’s attack control determines how long it takes for the envelope to reach its peak at the start of a note.
Decay and Sustain - An envelope’s decay control determines how long it takes for the envelope to decrease from its peak to the sustain level. The envelope will then stay at the sustain level as long as the note is held.
Release - An envelope’s release control determines how long it takes for the envelope to decrease to its minimum level after the note is released.
So, all of these four controls work together to create an envelope’s shape. The sound is sculpted from how it begins, how long it lasts and how long it takes to disappear using these envelope controls. Learning Synths explores these parameters within the context of the envelope modulating the pitch of the sound, but as we’ve mentioned, envelopes can be used to modulate other parameters of the sound, to create weird and wonderful results. They then go on to show an example of an envelope modulating amplitude instead of pitch, The Attack, Decay, Sustain and Release controls work the same in this case, but it’s the amplitude of the sound, rather than the pitch, that they’re having an effect on.
The final page of the envelopes section allows you to recreate the envelope of real life instruments using a synthesiser. Studying the characteristics of a sound and then recreating it with a synth is how synths are able to imitate everything from Brass instruments to Drums, Guitars to Flutes, and everything in between!
LFOs
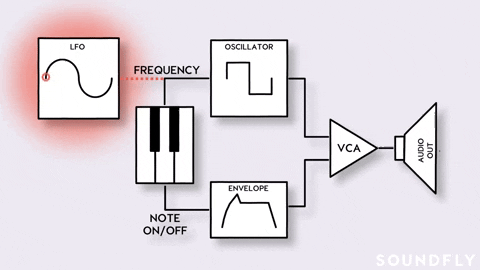
An LFO is another control on a synth, it’s a type of modulator and it stands for Low Frequency Oscillator. Learning Synths offers a great diagram for depicting how an LFO can modulate a sound, by giving you a merry go round with a speaker on it. Once you click the speed slider, the merry go round spins and the sound changes accordingly as the speaker faces away from you versus as it faces you.
This is a type of repeating back and forth change or modulation, and synthesisers achieve this using an Oscillator instead of an envelope.
An LFO is named such because the frequency at which it moves is much lower than that of an Audio Oscillator. Learning Synths offers the great comparison: you can think of LFOs as robots who make a repeating change to some aspect of the sound.
An LFO can modulate an aspect of a synth’s sound with varying speeds and intensities, the following sections go on to explain how to edit an LFOs Rate and Amount, with handy little infographic games to illustrate the effects!
Rate is how quickly the LFO modulates the sound, measured in Hz. The higher the Rate, the faster the perceived changes take place. The Amount is how much the LFO affects the sound. In their example of modulating pitch, the Amount changes whether the sound is changed by a few semitones at its lowest, or a few octaves at its highest!
The final point on LFOs is how the different waveform of the LFO, Sine, Square or Saw, effects the characteristics of the modulation. Again, there are useful little audio and visual examples to demonstrate this.
By now, you should have been able to get a really solid grasp on these core concepts. Ableton’s easy to use interfaces on this website are one of the best resources I’ve found for learning how synths work. Obviously certain people learn in different ways, but this interactive approach gives a great hands on experience that watching a tutorial video, or even reading an article can’t quite recreate!
How synths make sounds.

So far, the topics covered have been characteristics of the sound itself. Amplitude and Pitch have been covered, as well as Envelopes and LFOs, but we are still left with the question of how exactly a synthesiser creates a sound in the first place. Remember in the last section where Audio Oscillators were mentioned? That’s what Learning Synths focuses on in this next section.
There’s a wonderfully cute animation of a little Bee, and the example is as follows: We hear a Bee due to the flapping of its wings. When the flapping becomes fast enough, we perceive it as an audible tone. There’s a slider under the diagram, that allows you to control the speed of the Bee’s wings, and then the sound starts to become audible.
In general, humans can hear tones between 20 and 20,000 Hz, so once an Oscillator starts producing something upwards of 20Hz, it becomes audible to human ears.
An Oscillator is very similar to a Low Frequency Oscillator, except it moves much faster, creating an actual tone instead of just having an effect on another part of the sound.
We’re then introduced to synth waves, which were touched on with LFOs. Sawtooth and Square waves are demonstrated in another X/Y graphic, allowing you to play a loop of notes and drag the dot to create a Square or a Saw wave, as well as having an effect on the amplitude of the sound.

Learning Synths then moves onto Pulse Width, another control which dictates how an Oscillators produced audio sounds. I’ll let you experiment with these ones yourself.
A final point is made about Modulation, and how the rate of an LFO on a sound effects what we hear.
This is an important sound design discovery: slow modulations are usually perceived as changes to behavior (changes that are applied to the sound), while fast modulations are usually perceived as changes to timbre (changes to the character of the sound itself).
Filters

Another crucial element of a synthesiser is the Filter. We all know what these are, whether we’re aware or not, because they exist naturally in the real world. A filter controls what portion of the frequency spectrum is released, and there’s a great animation that allows you to experience this.
Imagine music playing in a room next to you. We all know what that sounds like don’t we? The animation allows you to drag a slider which ‘opens the door’ to that room, letting the higher frequencies through, allowing the music to become brighter and fuller. This is the basic concept of what a filter does to a synth’s sound.
A filter is often controlled on a Synth by the Cutoff parameter. This dictates -usually- at what frequency the filter cuts off. There are different types of filters, but for example, a low pass filter allows lower frequencies to pass through, while it cuts off higher ones. So, if you applied a low pass filter, with the cut off at 2000 Hz, you’d be allowing any frequencies under that value to pass through, and you’d be reducing the volume of the frequencies above it.
Again, there’s another great animation to illustrate this.
Another key parameter in a filter is Resonance. We’ve all heard a filter sweep sound effect, and this is a great example of how Resonance is used. What this does is it increases the Amplitude of the frequencies around the Cutoff value, so a small peak in the frequencies is created at the Cutoff value changes. A super high Resonance creates a whistling sound, and we’re able to explore this using a great animation on the site.
More resources
I won’t bore you with the specifics of the rest of the site, as it can’t be demonstrated as well through words as the hands on animations and mini synth games allow it to be. Plus, I don’t want to reveal all secrets here, otherwise where’s your incentive to visit Learning Synths anyway? They cover synth recipes, showing you how some classic recognisable sounds are created, as well as offering a playground in which you can create and sculpt your own synth sounds based off what you’ve learned.
The main point to take away from this is that learning the core concepts of synthesis and how synths create and shape their sounds is an invaluable skill to add to your repertoire. If you understand what controls do, you’ll be able to explore presets on your favourite synth, and instead of being overwhelmed by all the knobs and faders, you’ll have a fundamental understanding when you see the words Attack, Cutoff, Decay, LFO, Oscillator, Resonance and so on.
You can then understand how your favourite synth presets are put together, and even start to build your own if you’re so inclined! Sound design is a veritable rabbit hole of information, as there are many different types of synthesis once you’ve learned the basics.
Wavetable, Subtractive, Additive, Frequency Modulation. It’s a minefield.
Don’t worry though if this isn’t the route you want to go down; you don’t have to create your own synth sounds to benefit from this knowledge.
A core truth in music production is that the more you understand, the better you’ll be able to create music. And this is true with everything, not just synthesis. We’ve previously covered Music Theory, Compression, and Mixing, all of which are vastly different elements but which add up to create a well rounded, confident and competent producer. Adding an understanding of synthesis to this mix is another piece of the puzzle, another step on your journey to becoming the best possible producer you can be.
So take the time to explore Learning Synths, as it’s a hugely useful resource given to us by the team over at Ableton. They’re constantly looking to give users more content and ways to learn and use their software, so anything like this that they put out, you’d be a fool not to lap up!
We hope you enjoyed this overview of Ableton’s Learning Synths site, and make sure you stay tuned to Top Music Arts for all your production resources. Check out our other blog posts, as well as our videos and templates to see what you can find to keep you on your journey towards musical greatness!